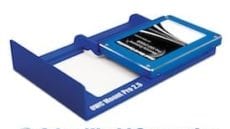
OWC Blog - blog.macsales.com

Tag-Archive for » Nehalem «

OWC Introduces Mount Pro 2.5″ Drive Sled For Adding Any 2.5″ SATA Drive To 2009-2010 Apple Mac Pro

Thursday, April 7th, 2011 | Author: OWC NewsFeed

Other World Computing today announced the OWC Mount Pro drive sled for adding any 2.5″ Serial ATA (SATA) hard disk drive or Solid State Drive (SSD) to 2009 and later Apple Mac Pro ‘Nehalem’ & ‘Westmere’ models. Manufactured with the highest quality processes and materials including powder coated aircraft grade aluminum, the $24.99 MSRP bracket comes backed by a lifetime warranty.

Offers Plug & Play Addition Of Performance Boosting OWC SSD

Mac Pro owners seeking to dramatically increase system performance can use the Mount Pro to add one of the fastest SSDs on the market, the OWC Mercury Extreme Pro SSD, and experience data rates up to 285MB/s. The bracket comes with four drive mounting screws and replaces an existing 3.5″ drive tray. The OWC Mount Pro perfectly aligns the SATA connector on the mounted 2.5″ drive into the back plane SATA ports on the Mac Pro. Article Continues…

Mac Pro and Radeon Video Cards, Part Deux

Wednesday, September 8th, 2010 | Author: OWC Grant

Actually, this might be part 3 or 4 of our updates that have captured the attention (and traffic!) of inquiring  Mac Pro users around the world. It all got started back in March of 2009 when OWC Larry himself told the faithful which NVIDIA and Radeon video cards worked on legacy machines.

Then, the big bombshell was when we posted this past August which Radeon video cards work with 2006-2009 Mac Pros.

Rather than bury another important update in that recent post and perhaps make this information difficult to find, we thought it best start a new post thread. (But for historical info and some GREAT reader comments, I highly encourage you to visit those above links.)

While most of us were enjoying an extended weekend of R&R, that uber-tech Rob-ART of Barefeats.com was laboring for the Mac community on getting more insight as to what Radeon cards and displays work with what Mac Pro.

What he learned was he could get  23″, 24″ and 30″ Apple Cinema Displays to work simultaneously on 2006-2010 Mac Pros with both the 5870 and 5770 video adapter cards.

How he achieves this feat is as follows:

1. 23″ Cinema or 30″ Cinema on the DVI port
2. 23″ Cinema with Mini DisplayPort to dual-link DVI adapter* on first Mini DisplayPort port
3. 24″ LED Cinema with direct Mini DisplayPort connection to second Mini DisplayPort port

* regular Mini DisplayPort to DVI adapter works if two 23″ Cinema Displays are attached.

For the full breakdown of his trials and results, visit his site index where he’s busy adding the details as addendum to existing articles.

***UPDATE 9/9/10***

Seems like your interest and OWC’sRob-ART’s coverage of the subject has gotten Apple to note which interfaces one should use when using multiple displays simultaneously:

http://support.apple.com/kb/HT4279

http://support.apple.com/kb/TS3477

Category: Tech Tips

OWC Reveals Which Radeon Video Cards Work With 2006-2009 Mac Pros

Thursday, August 26th, 2010 | Author: OWC Grant

Our blog has been buzzin’ with questions as to whether or not the new Radeon 5870 and 5770 video cards found in the new Mid 2010 Mac Pros work with earlier model year Mac Pros. When first asked about this, we referred to the Apple display page that conspicuously left out any model except 2009-2010 Mac Pros

Fanning the flames of desire for more knowledge/information on this subject was Rob-ART at BareFeats who did confirm a day or so ago that the Radeon 5870 does work with 2008-2010 Mac Pros.

So we dove in deeper to give all inquiring minds a full blown investigation you have come to expect from us. Here’s the breakdown:

2006-2007 Mac Pro:

  • Sorry to say it, but the 5870 is not…repeat…NOT compatible.
  • The 5770 is compatible, but only with the DVI connection.

2008 Mac Pro:

  • Both the 5870 and 5770 cards work with both the DVI and MiniDisplay Port connections in any combination of two displays. So, you can have two displays with MiniDisplay connections, or one with a DVI connection and one with a MiniDisplay connection.
  • Adding a third display will override the DVI connection, causing it to deactivate.

2009-2010 Mac Pro:

  • Both the 5870 and 5770 cards work with both the DVI and MiniDisplay Port connections in any combination of two displays. So, you can have two displays with MiniDisplay connections, or one with a DVI connection and one with a MiniDisplay connection.
  • Adding a third display will override the DVI connection, causing it to deactivate.

We have also confirmed that all NewerTech Mini DVI and MiniDisplay Port video adapter cables are compatible with all Mac Pro models. And that’s a good thing as they offer thicker cabling and better shielding for the highest quality, interference-free display output.

Speaking of adapters…you are familiar with the NewerTech USB to DVI/HDMI/VGA to Video Display Adapter? You know, the one that lets you add up to four additional monitors to your Mac? A very cool gadget that’s bus powered so its ideal for mobile presentation use as well.

So there you have it…what cards you can add to your existing Mac Pro…what cables you use for a higher quality display…and more display space overall. A visual trifecta!

=============

UPDATE 8/27/10 Well, a bit clarification on certain issues and reiteration of others…here’s what we discovered after additonal testing (and yes, some of your feedback):

  • Despite using a boot drive from a Mac Pro 2010 model, we still could not get the 5870 to work with a 2006-2007 machines. We tried both 1,1 and 2,1 machines with most up to date boot ROM and SMC versions. And were running 10.6.4 with all current Apple (AAPL) updates installed.
  • The 5770 in the 2006-2007 is compatible using the newest build of 10.6.4 which is included with the new Mid 2010 Mac Pros and allows you to take advantage of all three display outputs on the 5770.
  • The 5870 and 5770 are fully compatible with 2008 Mac Pros using the newest build of 10.6.4 (which again is included with the new Mid 2010 Mac Pros) and allows you to take advantage of all three display outputs on both video cards.
  • We incorrectly stated that you could only use two displays on the 2009-2010 Mac Pros. In reality, all three display connectors can be utilized simultaneously so you can drive three displays.

We will continue to investigate all these issues (esp. the 2006-2007 models) and update the findings here accordingly. Thanks for your patience while we sorted this out! Now, we gotta get back to making some eSATA equipped iMacs and the OWC SSDs going into them as well ;-)

Add More Storage, Swap Drives On 2010 Mac Pro With OWC Hard Drive Sled/Bracket

Tuesday, August 24th, 2010 | Author: OWC Grant

Geez…if we could just catch our breath on all the cool new products and announcements for these new machines! While the page information should be updated as I write this, we have confirmed that the OWC Hard Drive Sled/Bracket for the Early 2009 Mac Pro does indeed work with all the new Mid 2010 Mac Pro models.

Having a spare hard drive sled is a great and easy way to add more storage capacity to your new machine, with the convenience of being able to swap drives without requiring any tools. Now you can rotate backups and keep one off-site, keep large projects or client files on separate drives, or even just make it “slide and swap” easy to transfer large data volumes between two compatible Mac Pros.

It’s a pretty simple kit complete with mounting screws and vibration dampeners so you can mount your drive quickly and have it running quietly.

Of course, if you don’t have a spare drive, we also have a wide assortment of high performance 3.5″ hard drives up to 2TB from which to choose.

You’ll note that the product page also has some additional helpful resources, such as an installation video for how to install a hard drive into a Mac Pro and links to a sled/bracket for the 2006-2008 Mac Pros. Hey…don’t expect anything less than thoroughness from us! We’ve been in your shoes and like to be as informed as possible on all options when it comes to our gear.

Feed Your Mac Pro More RAM

Tuesday, March 31st, 2009 | Author: OWC NewsFeed

Everyone knows that the speed of your Mac’s processor is not the only factor to consider when you need that power to process graphics, sound, or video. How much RAM you have installed is also a critical factor. The new “Nehalem”-based Mac Pro models are no different, and the stock configurations offered don’t maximize your RAM. OWC to the rescue!

Twice The RAM vs. Factory Options

OWC offers up to three 4GB module-based upgrades not offered by the factory for the Mac Pro Quad-Core and 8-Core that allow you to pump up your RAM to 12GB (3-4GB RAM sticks), 16GB (4-4GB RAM sticks), or even 24GB (6-4GB RAM sticks, 8-Core Mac Pro models). The 16GB kit from OWC offers double the memory of the highest factory installed option (8GB) for the Quad-Core models. These high performance multi-channel 1066MHz DDR3 72-bit ECC memory upgrades represent a savings up to 70% on similar upgrades available from factory installs. Choose the RAM you want from our Qualified Upgrades for Apple Mac Pro web page.

Save up to $4300

For example, the 32GB factory installed memory upgrade for the Mac Pro 8-Core costs $6,100, compared to the $1799.99 OWC 32GB Memory Kit  - a savings of $4,300. In addition to the increased choices and savings offered by OWC Memory Upgrades, Mac Pro owners can retain their original factory memory modules for future use or send the modules to OWC for a cash back trade-in of up to $20 per Apple factory memory module.

It’s so simple, just slide out the processor tray, snap those new sticks in and you’re good to go. If you need help, never fear, our free online instructional video takes you through the upgrade steps; just click the Memory tab.

OWC Memory Upgrade Kits for the 2009 Mac Pro “Nehalem” models are engineered with premium quality components and are designed to meet, if not exceed, Apple Design Specifications, including use of Apple required thermal sensor equipped EEPROM, JEDEC board design, and chip components; and are fully RoHS and JEDEC compliant.

Performance Tested Proven

If more options and huge savings don’t already have you convinced on the value of upgrading with OWC, then check out our performance benchmarks for these upgrades.  Up to 51% faster performance from “the fastest Mac ever!”

Another Mac Pro upgrade video is available for your viewing pleasure.

Friday, March 27th, 2009 | Author: OWC Chris S.

Last week, we showed you how to bump up the memory in the new Mac Pros. This week’s video shows you how to perform the next most popular upgrade –  adding another hard drive.

Adding a hard drive or two to your system is always a good investment. You can use the extra storage for a number of things, including Time Machine backups, Photoshop scratch disks, and just plain old extra storage.

As far as how big of a drive to get… well… that’s up to you. Suffice it to say, though, I’ve not come across a customer who was upset they bought too large a drive.

Regardless of how large or how many hard drives you want to add to your new Mac Pro, the video for the process can be found in our Tech Center or, if you prefer, on our YouTube Channel.

Installing a 5th Hard Drive into a new Mac Pro ‘Nehalem’

Friday, March 20th, 2009 | Author: OWC Michael

In response to a recent blog question we received: Yes, you can install a 5th hard drive into the new 2009 Mac Pro ‘Nehalem’ machines.  Simply use the second optical drive bay.  The SATA connection is the same for a hard drive as it is for an optical drive and both run off the same system BUS.

Adapter bracket attached to a 3.5" SATA hard drive.

Adapter bracket attached to a 3.5" SATA hard drive.

Now, the only issue you will run into is how to secure the drive. Simply put, Tab A is not supposed to go into Slot B.  How do you get a 3.5″ drive installed into a 5.25″ bay?  You use an adapter bracket.

http://eshop.macsales.com/item/Apple/CLONESLED/

We do carry just such a bracket that will work – originally designed for the Mac clones and PC cases – it does functionally secure your drive in the bay.  However, if you use your Mac Pro in an audio-sensitive manner, be advised that suspended metal-on-metal provides no soundproofing.  While this will work for those that don’t mind the low hum of a drive spinning, this is not a solution for extra storage capacity if your Mac Pro is intended to be in the same room as your audio recording.

Hard Drive installed into the 2nd optical bay of a Mac Pro 'Nehalem' machine.

Hard Drive installed into the 2nd optical bay of a Mac Pro

For those audiophiles among you who must have a zero ambient noise environment, don’t fear … we’re working on it. Currently, we’re waiting on delivery of additional bracket systems and when we’re satisfied with their performance, we’ll be offering one or more solutions to you.  Watch the blog for developments on this and if you haven’t already, sign up for OWC Larry’s newsletters where the latest and greatest products are usually first announced.

UPDATE (4/17/9) - Well, the good news is that we have found a very elegant solution for installing 3.5″ drives into the optical bay of the Mac Pro that does reduce the hard drive noise as I mentioned back on the 6th of this month. The bad news is we’re still a few weeks out before we’ll have any stock on them. However, you can check out the X-Swing by (((NoiseBlocker))) and even pre-order.

X-Swing installed pics:

The optical and one hard drive installed.

Two hard drives installed.


Note:

Only the above two configurations will fit in the optical drive bay of the Mac Pro.  Two hard drives plus one optical drive combined is too large for the space.

Update: Since this article was posted, we’ve come up with several mounting solutions… See our blog post on Drive Adapters Galore—Which Is The Right One? for more information.

2009 Mac Pro “Nehalem” Initial Speed Tests

Friday, March 20th, 2009 | Author: OWC NewsFeed

In initial testing on the base processor speed of the new 8-Core Mac Pro, we’ve seen a much faster performance, up to 40%.

We used the TotalBenchmark product, developed by Media-Motion.TV. This test uses Adobe After Effects CS4 with multiprocessing enabled in the After Effects Preferences and no other programs running in the background. While the test was designed originally for After Effects 6 and updated for After Effects 7, it still runs under CS3 and CS4.

We also partnered with Bare Feats to push the new Mac Pro machines through speed tests for all five models. Bare Feats contends that six memory sticks are faster than eight in the 8-core Mac Pro, in terms of raw memory throughput as shown by the DigLloydTool memory stress test. The six sticks are 15% faster consistently.

That difference, however, doesn’t show up in the real world unless the application’s demand for memory transfers exceeds the bandwidth available. Rob at Bare Feats finds that “putting memory in the first three slots of each memory bank produces faster memory transfer speeds than filling all four slots on each bank.”

Bottom line: If you want the fastest rendering performance – get the most cores and upgrade memory to the max. As we’ve shown, certain applications, such as After Effects and Compressor, use subprocesses to grab as much as 3GB per core to deliver maximum performance. Take this a step further and you can run more applications and more processes concurrently. So, say goodbye spinning beach ball and hello to the local beach!