

 Whether you’re new to the Mac platform or have been using it for years, there’s one feature built into Mac OS X or macOS that you should not only know about, but use. That feature is Time Machine, a built-in backup application used to keep an up-to-date copy of all of the files on your Mac. Time Machine is unique among most backup applications in that it captures exactly what was on your Mac on any day in the past, making it easy to recover files, emails or media that may have been inadvertently deleted. While what Time Machine does is surprisingly complex, setting it up and using this feature is quite simple. We show you how to use Time Machine and answer “how long does Time machine take” on your Mac:
Selecting a backup destination
To start setting up Time Machine, you need to have a backup destination — the device on which your files will be backed up. Time Machine can back up to many devices:
• An external hard drive or solid state drive connected to the Mac over USB, FireWire or Thunderbolt. OWC offers a huge variety of external drives, using FireWire, USB 2, USB 3, Thunderbolt and Thunderbolt 2 connections.
• An external hard drive or SSD connected to the USB port of an Apple AirPort Extreme 802.11ac or other Wi-Fi routers that specifically provide Time Machine compatibility over a Wi-Fi connection.
• An Apple AirPort Time Capsule or an OS X Server on the same network as your Mac.
How often does Time Machine back up your Mac, and for how long?
Time Machine performs a full backup of your Mac when it is first set up. This initial backup can take some time, so be patient and allow it to finish. Once the first backup is complete, Time Machine checks your Mac for new, changed, and deleted files once every hour. Time Machine keeps these hourly backups for the past 24 hours, then keeps a daily backup for the past month. It also keeps weekly backups for as long as the external drive that you’re using for Time Machine has available space. Once the backup drive is full, the oldest backups are deleted from Time Machine.
Related: Yes, You Can Use One Drive for Time Machine and File Storage
For this very reason, some Mac users prefer to use Time Machine for their regular backups, but make bootable full backups of their Macs frequently on another external drive using a backup utility like Carbon Copy Cloner or SuperDuper!.
Setting up Time Machine
With a properly-formatted and empty external drive, setting up Time Machine is simple — just connect it to your Mac. If this is the first time you’ve specified a backup device, Time Machine asks if you want to use that drive to back up the Mac with Time Machine:
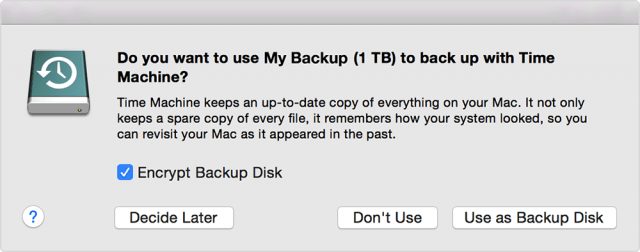
To use the drive as your backup disk, just click the “Use as Backup Disk” button and Time Machine begins the initial backup. That was easy, wasn’t it?
One thing you may want to do is encrypt your backup disk, so that it’s impossible for others to look at your backup files without knowing a password that you’ve set. This is also easy to set up; check the “Encrypt Backup Disk” box as seen in the image above, then provide a password when prompted.
The external disk you have purchased from OWC may or may not be formatted in the format that Time Machine needs. That format is called Mac OS X Extended (Journaled), which sounds daunting but really isn’t. If the drive isn’t in that format and is using the common Windows-based NTFS or FAT formats instead, Time Machine will prompt you to reformat the drive. Before you let it reformat the drive, realize that doing so completely erases all files on the external drive. If you’re thinking about re-using an older drive for Time Machine and wish to keep the files stored on it, then don’t reformat; get another drive that is blank.
Using Time Machine with an Apple AirPort Time Capsule
Apple’s AirPort Time Capsule is an interesting hybrid device, part backup external drive, and part Wi-Fi router. The wireless capabilities are really useful with the MacBook line, as the laptops don’t need to be physically connected to a drive to stay backed up. The process of setting up Time Machine to work with an AirPort Time Capsule or other Network Attached Storage is different.
The AirPort Time Capsule needs to be set up properly and working prior to using it for Time Machine backups. Either a Mac or iOS device can be used to set up and configure the AirPort Time Capsule; full instructions for the setup process are included with the device, or can be downloaded here.
Once that’s done, click on System Preferences in the Dock on your Mac, then select Time Machine. The preference pane looks like this:

Click the “Select Backup Disk” button, and something similar to the screen seen below appears:
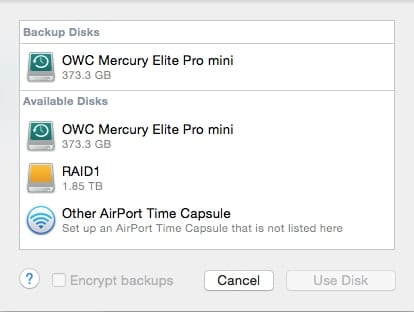
The AirPort Time Capsule should appear as one of the Available Disks. If it doesn’t appear, click Other AirPort Time Capsule to select yours. Once you’ve selected the AirPort Time Capsule by highlighting it in the list with a click, click the “Use Disk” button. As before, you can select to encrypt your backup. There’s also a checkbox to “Show Time Machine in menu bar”. Some people may not want or care to know if Time Machine is in the middle of a backup, so if that’s the situation with you, just uncheck that box. If the Time Machine button Off/On button (see the image of the preference pane above) is in the Off position, click on it to turn Time Machine on. The backup begins.
The Initial Backup
Now comes the fun part; Time Machine backs up each and every file on your Mac. Fortunately, you can continue working on your Mac while it’s doing the backup. Be sure to leave your Mac on so that Time Machine is able to capture all of the information. Once the first backup is complete, you’ll see a notification similar to the one shown here:

When using an AirPort Time Capsule, it’s sometimes much faster running the initial backup if you run an Ethernet cable between an Ethernet port on your Mac and an open Ethernet port on the AirPort Time Capsule.
Everyday Backups
After the initial backup is done, Time Machine automatically begins to back up any files that have changed on the Mac since the last backup, and it does this every hour on the hour as long as there’s a connection between the Mac and the backup destination. Even a MacBook set up with Power Nap (a function that allows the device to check for mail and other notifications on a regular basis while the MacBook is “sleeping”) will still perform Time Machine backups.
Provided that you didn’t uncheck the “Show Time Machine in menu bar” box described earlier, you’ll be able to see when a backup is taking place. Here’s what the Time Machine menu bar icon will look like under different conditions:
![]()
This indicates that Time Machine is currently idle
![]() The extra arrow in this icon indicates that Time Machine is working on a backup. On older versions of Time Machine, the arrow would move in a circle, which many Mac users found to be endlessly distracting.
The extra arrow in this icon indicates that Time Machine is working on a backup. On older versions of Time Machine, the arrow would move in a circle, which many Mac users found to be endlessly distracting.
![]()
![]() If you see either one of these icons, it means that something has happened that’s preventing Time Machine from backing up. Clicking on the Time Machine menu bar icon can show what’s causing the problem, or can just (as in the image below) display the current progress of a backup.
If you see either one of these icons, it means that something has happened that’s preventing Time Machine from backing up. Clicking on the Time Machine menu bar icon can show what’s causing the problem, or can just (as in the image below) display the current progress of a backup.
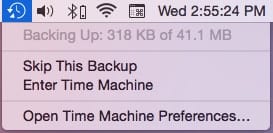
Let’s say you’ve just finished working on a very important document. To make sure that it’s safe from a possible drive failure on your Mac, you can manually start a Time Machine backup. From the Time Machine menu, select “Back Up Now” to start things up.
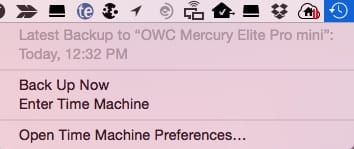
On occasion, it’s good practice to verify the backup disk to make sure it is sound. Selecting this menu while pressing the Option key provides the option of verifying backups or even switching to a different backup disk.
Restoring files or versions of files from Time Machine Backups
The entire reason you use Time Machine to back up your Mac is to be able to retrieve accidentally deleted or corrupted files, or to restore an entire system if your primary (usually internal) storage fails. In this section, we’ll show you how to restore a file from a particular point in time. If you need information on how to restore an entire system, that’s later on in this article.
When looking for a file or folder on your Mac, switch to the Finder then choose “Enter Time Machine” from the Time Machine menu. Your Mac display transforms into something that looks like this:
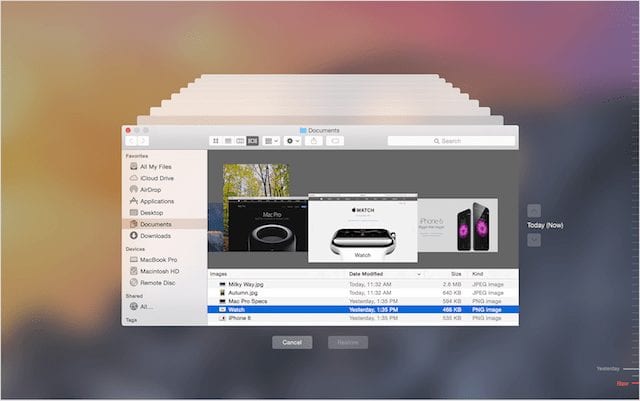
On the right side of this window is a timeline showing various dates and times back until the oldest backup saved by Time Machine. To reach a specific point in time, click on the appropriate line on the timeline. If you’re not sure when you deleted or changed a file, use the up arrow located just to the right of the Finder window to travel “back in time”. When the folder or file you’re missing or that you changed appears, stop at that point in time.
Sometimes you know the name of the file that you’re looking for. You can search from the Time Machine Finder window by typing a search term into the Search field on the top right of the Finder window. Then use the up (back in time) arrow to have Time Machine search through the backups to find the file or folder.
To restore a file or folder, just select it by clicking on it, then click the “Restore” button seen below the Finder window. Unsure if it’s the right version of the file? Use Quick Look before you restore it by just pressing the space bar once you have selected the file.
When the file is restored, it’s actually copied to the Mac desktop or the folder that the file was originally in. Sometimes, you may be restoring an earlier version of a file with the same name as one that’s already in a folder — if that’s the case, you’ll be asked to select which of the two files to keep, or if you want to keep both. Right-clicking or control-clicking on a file in the Time Machine window display additional options.
Restoring or Reverting in Apps
Some apps — Pages being a perfect example — support a way to revert to earlier versions of documents while in the app. To do this, open a file that you want to revert to an earlier version of and then either select Enter Time Machine from the Time Machine menu, select File > Revert to > Browse All Versions from the menu bar (if this doesn’t exist, then the app doesn’t support Time Machine directly), or if you have a Time Machine icon in the Dock, click on it.
Every version of the document that has been saved appears on the screen in the now-familiar Time Machine timeline. Once you’ve found the version you wish to revert to, just click the Restore button underneath to copy it back to the present time.
Restoring a Mac From a Backup
One of the most depressing situations a Mac user can run into is having a primary storage device fail. But it doesn’t have to mean that you’re down and out! Once the drive has been replaced, it’s actually quite simple to restore the entire system from your Time Machine backup. Here’s what you do once there’s a new drive in your Mac:
1.) Connect the Mac and the Time Machine drive, and turn on the Time Machine drive. If the Time Machine drive is on the network — an AirPort Time Capsule, for example — make sure that the Mac is on the same network before proceeding.
2.) Either restart the Mac using the Apple menu > Restart, or turn the Mac on if it’s currently shut down. Once the Mac boots and you hear the startup chime, hold down the Command (⌘) key and R key simultaneously. When the Apple logo appears on the screen, you can release the keys and the Mac boots up from the Recovery partition stored on the drive and into OS X Utilities
3.) From the list of OS X Utilities, select “Restore From Time Machine Backup”, then click the Continue button.
4.) Next, select the Time Machine backup. If it’s on an external backup disk, select it by clicking on it, then click Continue. When the Time Machine backup is on an AirPort Time Capsule, select the network from the AirPort menu on the right side of the menu bar, select the Time Capsule, then click “Connect to Remote Disk”. Finally, if the Time Machine backup is stored on a network backup disk (for example, an external drive connected to a Wi-Fi router or an OS X server), select it, and then click “Connect to Remote Disk”
5.) You may be asked to enter a name and password to connect to the backup disk. If requested, enter the appropriate information, then click Connect.
6.) A list of the dates and times of backups appears. Select the one you want — usually the most recent — then follow the onscreen instructions to restore all data and settings onto your Mac.
Once the system has been restored, Time Machine will probably perform a full backup at the next scheduled backup time. This is perfectly normal, and the hourly backups begin again once the full back is done.
For a look at how one drive can be used for both Time Machine backups and for storing your files, please visit: https://eshop.macsales.com/blog/36128-yes-you-can-use-one-drive-for-time-machine-and-file-storage
For more Time Machine tricks, guides and quick answers for macOS Mojave, High Sierra or earlier, check out our Tech Tips section.


Does it back up all apps or just apples? I ran a backup during a recovery process and it did nothing. It said it completed. And apple folks said it would do all my apps. I had already copied files to a separate disk because they said I had to dedicate a disk to Time Machine so I separated my files from my apps to make it work.
I looked at the Time Machine disk today and it appears to have absolutely nothing on it. Every time I read something about it, the explanations for how it works and what it actually does is different, including talking with the folks at apple.
Can you confirm which apps it will back up? Do I need to go in and tell it to back up each individual one and that’s why I got no results? Sonoma update really buggered up my system Won’t be upgrading to it again any time soon
Dear Steve,
I recently backed my Mac air book up to a 5tb external HDD. I did this because the previous 2tb drive was full. However, although I didn’t format the new 5tb HDD, all the backup files copied from the old drive to the new one. Then, after a couple of weeks with Time Machine running on automatic back ups, the new 5tb HDD started giving Disk Unable to Write to warnings, and suggested use another disk to copy the data to and re- format disk. I bought a 10tb HDD, formatted it, then tried to copy the backup file from the 5 tab HDD to the new 10tb disk. BUT, when I looked at the amount of data that is contained in the Backup folder on the corrupted 5tb HDD, it says there is 64 tb of data! How can this be, and what should I do? Any help would be much appreciated. Regards. Alex.
Hi, nice article. I have two TB hard disk for time machine backup. out of 2 TB 1.3TB still available but the oldest backup in my disk available just Dec 2021. In nutshell I can only restore my old data till last Dec 2021. Currently Aug 2022 going on. So I have only backup for last 8 month while disk is still 1.3 TB free. Why time machine not allowing to keep more older backup e.g. say last one year or last two year despite DISK has plenty of space? how to enforce that?
Regards
Manish
I’ve been using time Machine since 2008 with no problems until recently. For the last couple of years, I’ve noticed that it is backing up about 2.35GB every hour overnight when the Mac is not being used. It also backs up at least this amount during the day when I’m just working in one Pages document. These back-up really slow me down despite having 16GB of RAM a 3GHz Quad Core i5.
Any idea why this is happening?
Mac and apps are up to date. Monterey 12.0.1.
Thanks for any help.
Hi Steve
Could you help me please?
I have an ‘obsolete’ iMac – as described by the Apple Support team. It is about 10 years old. MacOS High Sierra. Version 10.13.6.
I have regular reminders that Time Machine could not complete the back up to Time Machine backups. The message says “Files can’t be copied onto the backup disk because it is read only. You may need to repair or erase the disk using disk utility. If the disk can’t be repaired, select a different disk for backups.”
One other thing. I haven’t a clue about this type of thing. And one solution about erasing data sounds drastic
Any help in plain English would be much appreciated
Many thanks in advance
Paul
Is it possible to back up My iTunes library on my time machine? I have a macOS High Sierra version 10.13.6
Hello, I have a personal MacPro 2015 which I have maintained in good shape. At this moment I can’t used it because I unknown source hacked the entire system. I am not longer the administrator. An extra Macintosh HD, disc,and other applications were created. I found a lot of script and conversation between more than one person, travel infor etc..I mean documentations that do not belong to me. By clicking here and there I deleted the screen side that I was using by deleting a keychain I guess, to ended up in another screen system which was where I found all the unknown stuff. Apple could not help. At this moment, the screen shows a black screen with a folder and question mark.
Most of the original applications that come with the system has never been created by me because I haven’t the need to create such accounts,but the hackers did. hackers downloaded a lots of new applications where their could write documents. I do not qualified for being a financial target. Would like to know if I send my PC for clean it up, do you think that hackers will still haven access to my PC??
Is my identity stolen? Apple, Yahoo and my network must know the identity of these hackers and I want to know if I can save all the stuff hackers done. I know after reading your article that a time machine has been created. I also found that the calendar time was setup to 1946
Your answer will be truly appreciated. I can access online only by phone.
Thanks
Ana
how can I access time machine records about 2 years ago
will Time Machine back up aps like Photoshop.
Well done information, Thank you.
Hi if the time capsule is plugged into my router is it backing up my information to the time capsule i don’t know about
I understand that time machine only knows up to 14 January 2038 what happens after that please. Is a new system in the pipeline?
I was wondering what is going on in background that takes MAC so long to just “prepare” the backup. It must be building an image of sorts. Can there ever not be enough room on the system drive that would prevent a backup?
If I have time machine backups from a previous older computer on external disks can I find and retrieve files from those backups on my current machine with a different version OS? I need to retrieve photos.
I am doing a backup with an external harddrive and only as a result did I learn about the Time Machine Back Up. I just did this with the external and tried to open my photos when the back up was complete to check that they were all there and it says it can not open because they are stored in Time Machine Back Up. Does that mean they are not on the external one as well?
The idea of setting up a Time Machine (TM) Backup usually requires a fresh never before used disk.
I myself use 2 disks for TM Backups BECAUSE at least 1 disk should be offsite. Offsite implies that the location of the Mac could be destroyed by fire and it may also destroy 1 of the 2 TM backup’s.
On a PC this is also true. Many PC’s have been attacked by a Virus which encrypts ALL the disks it can find – meaning that your photos, word, text, excel files are held to RANSOM. You pay someone to get back the original files. NASTY.
So never have both disks attached at the same time.
As for finding out TOO LATE that your original copy and paste backup files have been wiped – as you changed the external disk over from (Copy & Paste) to (TM) – not a good solution.
However if you have two drives you can usually make the TM drive support some form of Copy&Paste (C&P) – BUT only AFTER it has been configured for TM use. Then the procedure is in summary …
Configure the brand new 2nd disk as a TM disk. Run TM and TM_Backup your Mac (internal stuff) to the new TM disk.
Create a directory on the new TM disk – lets call it “Copies” or “Copies_2017” or “Copies_20170515” … {century}{year}{month_number}{day_number} format.
Now copy all the files across from the older original C&P backup disk to the “Copies” folder. Verify it – maybe just checking that all the files (they should have a very similar count) came across.
So now the new TM disk should have all your data. Now you can disconnect the new TM disk (eject it) and now setup the OLD C&P disk as a TM disk. You should run the TM backup again using the new TM disk.
After that you should again connect the original TM disk (with the “Copies” folder on it) and now copy that folder onto the new TM disk.
The end result should be 2 copies of the “Copies” folder – one copy on each TM disk.
I have a MBP with 750 GB backed up to a “4 TB Porche Design” USB drive. The 4 TB Porche Design seems to be the largest capacity SPINNING disk drive that does not require an external power supply – it drags its power to SPIN the platters around from the USB v3 Power lines – so it is best to
A) use the power charger while doing the TM backup operations
B) make sure you have enough power in the MBP battery to cover the time required for the many TM backups that should occur during the day and night operations of the MBP.
Why the 4 TB Porche Design is nice ?
Well it happens that this drive comes with 2 USB cables – one for connecting to the older Mac’s and the other is designed to connect to the latest USB3-C – which is a different size and shape and also provides slightly more power from the newer Mac’s.
So with 2 such cables supplied I can buy a new MBP – which only has USB3-C connections
and still connect my drives and restore any thing I want.
And YES the Migration Assistant (MA) is truly great. eg 2 Mac-mini systems manufactured 8 years apart – the old one with a GPU graphics display issue, so a newer model was purchased. I Migrated everything from the old to the new in 2 hours. Everything means everything. Perhaps I was just lucky but the MA transferred all the users and their data plus all the printers and the network configurations and even a foreign DataBase (DB) application.
It used the latest OS version and I spent a bit of time to tidy up the cables.
So most Windows people will have another story to tell about the time spent making sure that the License keys were installed
even if they had to buy a new license because the user has lost his old License info. SIGH poor windows Admins!
Kind Regards
Helpful
This is a very useful, clear article but may I suggest that you add a paragraph to explain what happens when the backup drive becomes full, stressing that users should NOT attempt to delete old backups manually. I made this mistake and it took a lot of research on the Internet and many hours to sort out the ensuing problem.
I am still not entirely clear how best to handle the situation.
thank you for the full explanation how time machine works, well presented, easy to read with the helpful diagrams. :-) A friend set-up my external hard drive making 2 divisions/sections:- 1 for back-up and 1 for time-machine about 2 yrs ago. I didn’t fully understand how it worked back then and what I had done was drag-dropping my folders from an old macbook into the back-up section of the external drive and then deleted the said folders from the macbook and ran time machine. My confusion is now is how to I migrate these folders to a new macbook pro without duplicating and how to then: reformat the external hard-drive as a full time-machine with no sections/partitions? Look forward to your help.
Migration assistant comes with new Macs. It’s in the applications folder.
You can transfer the files from the old Mac to the new without using the Time machine backup.
You can also set up Time Machine on the new Mac and point it to the backup you currently have.
That’s one of the reasons to store your files on a backup device: you can retrieve the files and place onto another/new machine.
Much time required
The main reason I purchased an external hard drive is to free up space on my computer’s hard drive. I have a lot of photos and videos that I want to keep in an archive, but not on my computer. Will my external drive work for this purpose? How does Time Machine come into play in this scenario?
Will Time Machine restore all my software such as office and adobe?
I’m confused. In step 2, you say that the Mac boots up from the Recovery partition stored on the drive and into OS X Utilities. But I’ve just replaced my drive with a new one. So where is this partition?
TM has saved my a** many times over the years!
The only problem is, once it reaches its capacity (currently 2TB on my Time Capsule 5th Gen), it does not simply over-write the oldest files & continue – it tells me the disc is full & I have to erase it & start over.
1st reported to you in April 2016!
Guess I’ve missed something but numerous attempts to diagnose & fix what is going on have proved fruitless.
But I love the program!
When I bought my mac the shop staff backed up all my files on a 1 tb external drive and configured it with Time Machine. i have some old photos on there that I would like to access. Any ideas
How can I move or transfer emails from SeaMonkey to Thunderbird? I have older versions on Mac OS 10.6.8 and SeaMonkey is no longer supported for Macintoah applications.
Thank you.
I am feeling so cheerful to examine your blog post,really dazzling post you have shared,
My Time Machine (2 years old) has recently failed. My MacBook Pro does no longer recognizes it. Tests with other MacBooks have the same results. What are my options? Prorated replacement possible? How?
its a very much
surprising
and scientifically posible at all
I am also agree with you dear..
if you need any help regarding windows then visit here
windows-helplines.com/
I agree about the need to call Unitrends support frequently. However they definitely make an effort to get things fixed fully.
Do multiple external drives need to have the same name
I have my MacPro & iMac backed up to Time Machine. It works great to find a lost file.
BUT, when the 2 TB HD recently filled up, it stopped backing up & I was forced to Erase the HD & start over.
I thought Time Machine would sequentially delete the oldest files once it filled up.
Is there something I have done wrong?
Thanks!
…John
Hello John,
Thank you so much for your question. It is very possible that the amount of DATA from your MacPro and iMac have surpassed 2TBs of DATA. If you are trying to transfer more DATA then the Time Machine back up allows, you will see this problem!
Please feel free to contact our Technical Support Team and we will be happy to look further into this with you!
Hi Dyllon,
I have also experienced this issue. I was (also) under the impression from what I’ve read that OLD backups were deleted automatically to allow for new ones once the 2TB had be filled up. I’m using MacBook Pro, TimeMachine & my Apple external hard drive (the flat-ish & almost square one).
For 94 days I couldn’t do a backup – so today I did some research – discovered I was missing the latest firmware update so got that sorted – & right now thebackup is finally underway but it says it’s up to 4MB out of 212MB & am using wireless modem with ASDL internet connection. It’s going ok though.
Due to previous issues though (pre the firmware update today) I’m half expecting to get a message telling me there is no room for the backup!
How do I manually get rid of old backups / data on my external drive??
Hoping you can help me to finally sort out this annoying problem. Am not working so cannot afford to get a new device to back up to. If that’s the solution.
Kind regards
Lyn
Sydney
We are very sorry for the late response. Please know we will be reaching out to you for further assistance!
My OWC Mercury Elite Pro is getting full I am also backing up to it.. How can I get rid of old back ups?
In the part where it says (see below in quotation marks) select yours after selecting Other Airport Time Capsule I don’t get a Select Yours option. instead, after selecting Other Airport Time Capsule I get a “Set up” option but when I click on it, I am not able to set it up because there is no window to do that.
I have been using my Airport Time Capsule as a router for a year but never did set it up as a back up. How do I get that “Set up ” now message.
“The AirPort Time Capsule should appear as one of the Available Disks. If it doesn’t appear, click Other AirPort Time Capsule to select yours. Once you’ve selected the AirPort Time Capsule by highlighting it in the list with a click, click the “Use Disk” button. As before, you can select to encrypt your backup.”
Nice article.
Something not shown is that Time Machine can also backup data on external drives connected to the Mac.
For example, I have Time Machine back up all video and photo files, along with Adobe and Final Cut Pro libraries, on my external OWC Thunderbay 4 Raid5, and it does it just fine.
Just click on OPTIONS on the Time Machine settings panel, and under “exclude these items from backup” click on one of your external drives shown, and then choose the minus-sign “-” at the bottom to take the external drive off of the list of items excluded from backup — and it will start backing it up!
Then, if you don’t want some folders or files backed up, ADD them (with the plus-sign “+”) to the exclude list, using the full path name. Nice and easy!
George, I have also been doing some Time Machine backups of external drive folders as you’ve described. Question for you…..if I want to access and restore a file from the backup of an external drive, but I do not have the external drive attached to my MacBook Pro, can Time Machine bring the desired file from the backup onto the MacBook Pro? I don’t always have my ext drive with me when I’ve needed to use a file from it….wondering if can access the file from the backup? Thanks for any thoughts. Richard
Hi – original author of the post here. You must have the external drive attached in order to get the file back. All Time Machine stores locally (on the MacBook Pro) is a list of aliases (pointers) to the location of the files on the backup. Even though you might be able to tell that you did have a file in a backup, it wouldn’t be able to restore it without having access to the external drive.
Pretty thorough article but one thing folks should know is that Time Machine will eventually use all the available space on your drive. If you have are using the drive for other data, it is wise to partition the drive to limit Time Machine’s usage of space.
You can use more than one drive for backups and Time Machine will alternate, backing up to one drive, then the next backup to the second drive.
Also, someone correct me if I am in error here but when Time Machine deletes backups, it deletes the oldest files individually but will never delete the only copy of a file.
My experience with a 500 GB as a Time Machine did hit the full disk and the oldest files were eliminated. And that did include the only copy of a file. Precious information and memorabilia I now store in multiple places; SD/SDXC card, CD/DVD disk, 2nd external drive and iCloud. While I did have 3 computers on the same Time Machine and space was being swallowed up very fast, I have allocated an additional drive to act on only one computer daisy chained on firewire.
Excellent article. I finally understand how to use Time Machine backup system. Well done.