

 Disk Utility, in all of its incarnations, has always had a restore function, a way to copy a disk volume or image file to another volume, creating an exact copy. We often think of this as cloning a drive, so you have an exact copy for backup or archiving purposes.
The advantages of cloning are many, but the one that is repeatedly mentioned in troubleshooting guides, as well as guides to installing new versions of the Mac OS, is the clone’s ability to be used as a Mac’s startup drive. Provided the source for the clone was a bootable startup drive, then the destination will generally also be useable as a bootable startup drive, which is pretty darned convenient.
Disk Utility Restore
The restore function isn’t limited to creating clones of the startup drive. It can create a copy of any image or volume that can be mounted on your Mac. That makes the restore function extremely versatile, even if it’s largely overlooked in Disk Utility.
Two Versions of Disk Utility
Disk Utility was at version 16.0 at the time of this writing, so there have certainly been more than two versions. But when it comes to the restore feature, Disk Utility hasn’t undergone many changes; the biggest was the redesign of the Disk Utility interface that came about with the release of OS X El Capitan.
Because of that major change, we’re going to provide two sets of instructions for using Disk Utility’s Restore feature; one for OS X Yosemite and earlier, and one for OS X El Capitan and later.
What You Need
Restore will copy the source volume or image file to the destination volume, so you’ll need a disk that contains a volume large enough to hold the data from the source volume.
Both the source and destination volumes need to be mounted on your Mac. Restore will work with internal or external volumes.
If you’re planning on restoring from an image file you need to take the additional step of scanning the image file before the restore process. You’ll find instructions for preparing an image file near the end of this article.
Creating a Startup Clone
Using Disk Utility’s restore capabilities to make a clone of your startup drive has a limitation. Disk Utility uses a block copy method that provides for a faster copy, but it also needs to unmount all of the volumes involved in the restore process. Since the startup drive can’t be unmounted, you can’t make a clone of the startup drive directly.
Instead, you need to either boot your Mac to another drive that contains the Mac OS, or use the Recovery HD volume to start up and run Disk Utility from. This may seem like an inconvenience, but it provides for both a fast copy and a safe one; since the source drive can be unmounted, no process can make changes to any files resident on the drive.
Let’s start the step-by-step instructions with the current version of Disk Utility.
Using Restore With OS X El Capitan and Later
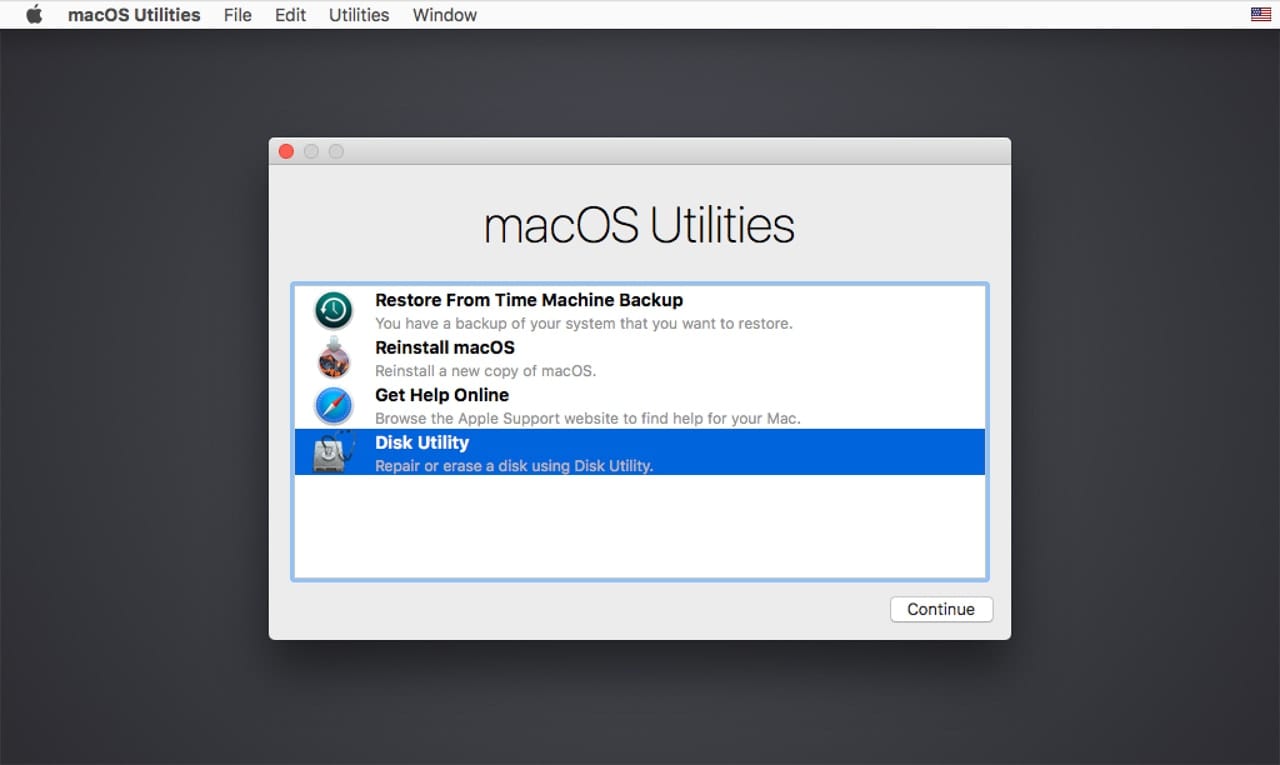
Go ahead and launch Disk Utility; you’ll find it at /Applications/Utilities/, or if you booted from the Recovery HD volume, Disk Utility will be one of the choices in the Utilities window.
In Disk Utility’s sidebar, select the destination volume you wish to have data copied to.
With the destination volume selected, click the Restore button in Disk Utility’s toolbar, or select Restore from the Edit menu.
A sheet will drop down, asking you to select the source volume. Use the dropdown menu next to the “Restore from:” text to select the source device, or use the Image button to select a disk image file.
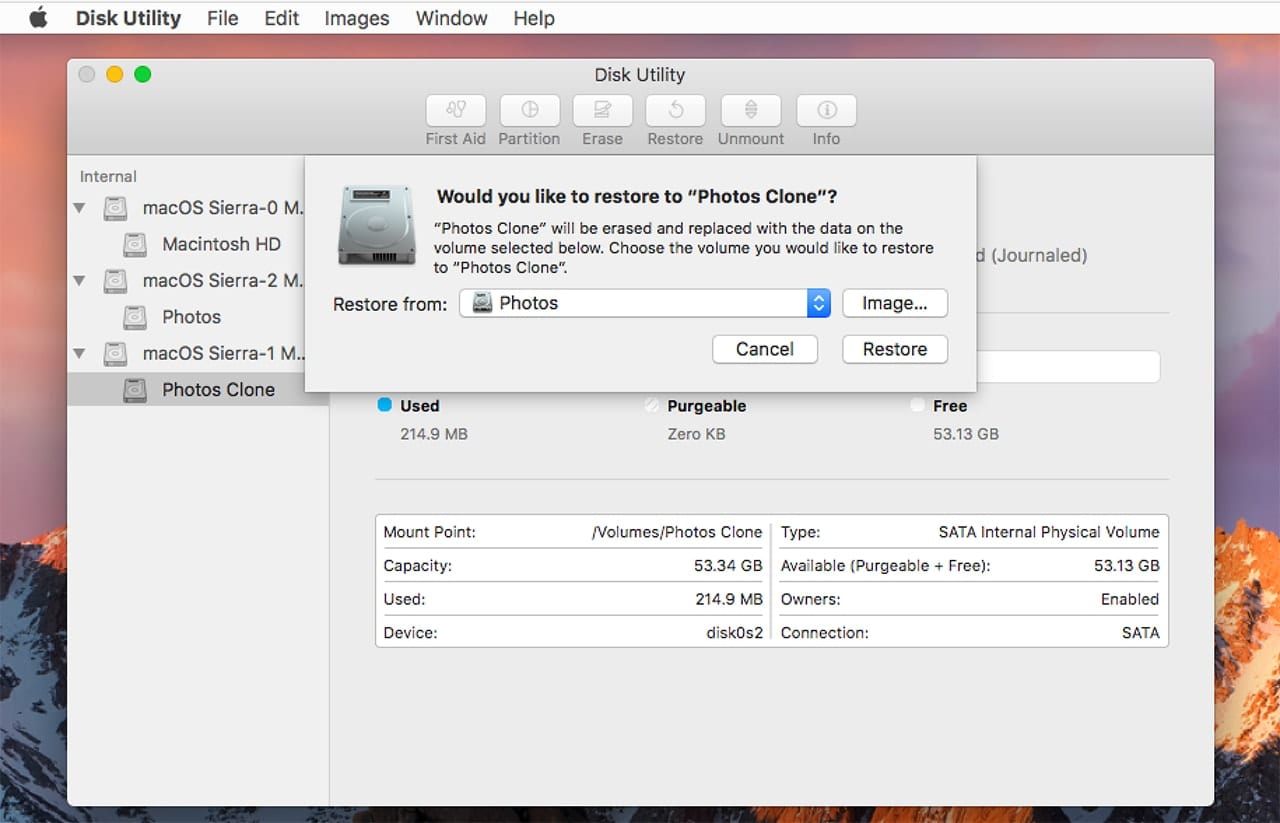
Warning: The selected destination volume will be erased by the next step. If you need any of the information on the destination drive, make sure you have a backup before proceeding.
Click the Restore button in the dropdown sheet.
The restore process will begin; if you wish, you can view the process by clicking the disclosure triangle next to the “Show Details” text.
When the copy process is complete, click the Done button.
Copying using the restore function will also copy the volume title from the source to the destination, so you’ll now have two volumes with identical names. You may want to change the name of one of the volumes, to make it easier to tell them apart.
Using Restore With OS X Yosemite and Earlier
The earlier version of Disk Utility uses a slightly different user interface. Instead of selecting the destination first, as we did with the version in OS X El Capitan and later, we’re going to select the source volume first.
Launch Disk Utility, located in the /Applications/Utilities/ folder. If you’re booting from the Recovery HD volume, Disk Utility is listed in the OS X Utilities window, which opens automatically.
In the Disk Utility sidebar, select the volume you wish to use as the source. You can change this later if you select the wrong volume.
Click the Restore tab.
The volume you selected should be listed in the Source field. If you wish to change to a different source volume, select the desired source in the Disk Utility sidebar, or use the Image button to select a disk image file.
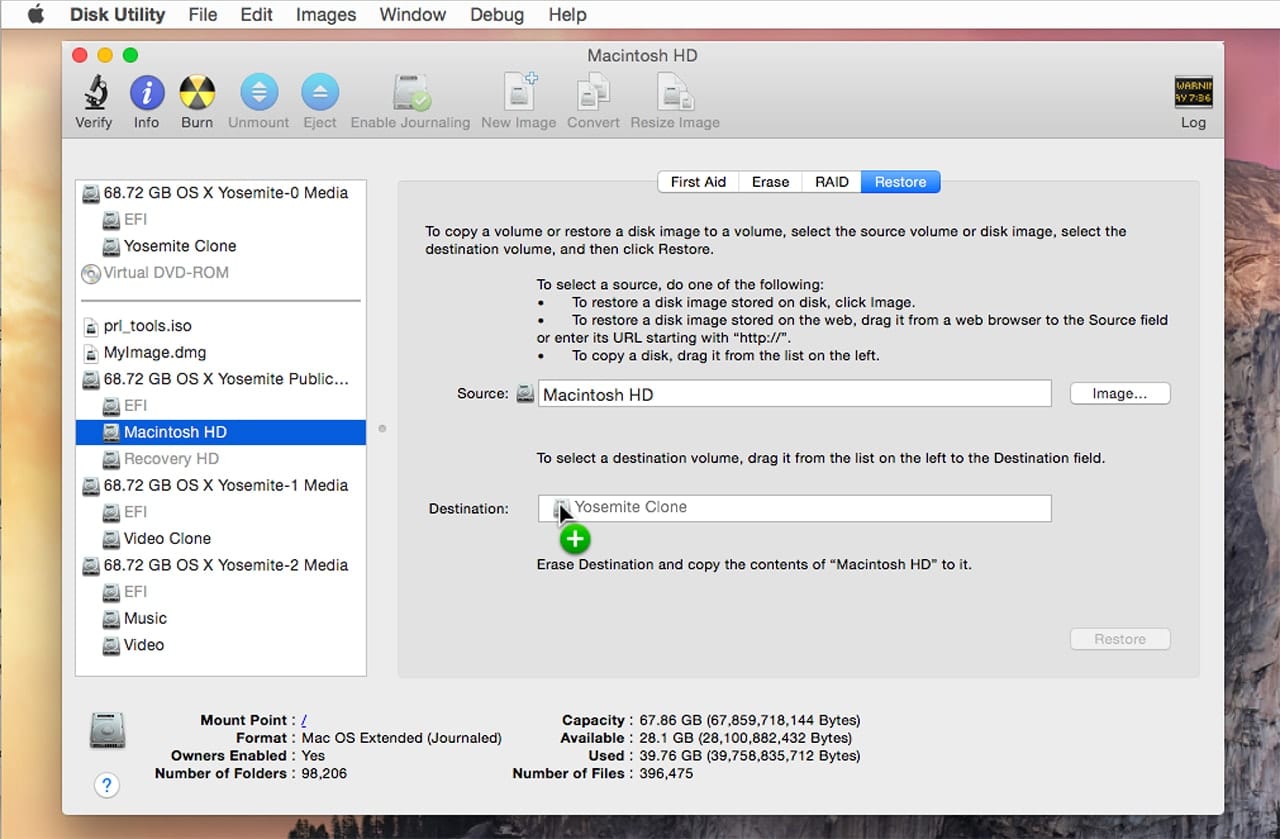
To select a destination, drag the desired volume from the sidebar to the Destination field. You can also drag a volume mounted on your Desktop to the Destination field.
Warning: The next step will completely erase the contents of the selected destination volume.
Click the Restore button.
A sheet will drop down, asking if you really want to completely erase the destination drive and replace its contents with the contents from the source drive. Click the Erase button to continue the restore process.
If requested, provide your administrator password, and then click OK.
The erase and restore process will begin; a status message and progress bar will appear near the bottom of the Disk Utility window.
When the restore is complete, the volumes will be remounted on your Desktop, and Disk Utility will remove the selected volume from the Destination field, leaving it empty.
The restore process also copies the source volume’s title to the destination volume; you may want to rename one or the other.
Restoring From an Image File (Any Version of Disk Utility)
Image files, those compressed .dmg files often used for distributing apps and data, can also be the source for the restore function. The process isn’t very different, except the image file needs to be prepared before it’s selected as the restore source.
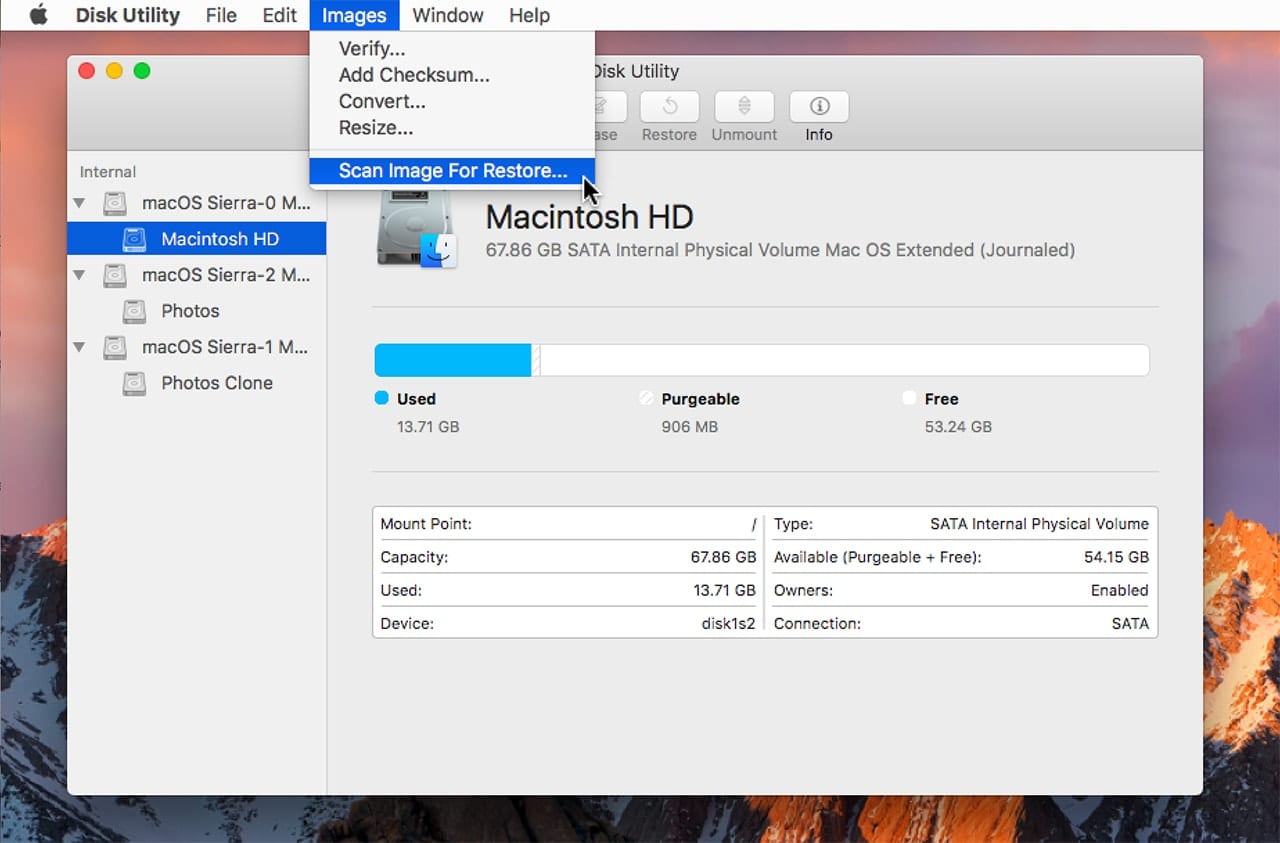
The process scans the image file, calculates the checksum, and reorders the files within the image.
In Disk Utility, select Images, Scan Image for Restore.
Browse to where the image is stored, then select the image file and click the Open button.
Provide an administrator password, if asked, and then click the OK button.
When the scan is complete, click the Done button.
At this point, the image file can be used as the source in Disk Utility’s restore process.
Image File Limitations
Scanning an image file has a few limitations that can prevent some .dmg files from being properly scanned. Generally, if the image file uses the compressed format it should sail through the scan process. Read/write formats and hybrid images tend to cause errors. If you need to, you can convert the image file format using the Convert command in the Disk Utility Image menu.
For more handy tricks and guides including the new macOS Mojave, be sure to check out the Rocket Yard Tech Tips section.


I hope this article has been helpful to you in getting started with Open Broadcaster Software.
I want to replace my original SSD of 128GB of my Macbook air 2012 to a new SSD of 440GB, since my mcbook air is getting to slow to the basic tasks. Today I tried to clone the information the whole “Macintosh HD” disk which is in the original 128GB SSD to the new SSD of 440GB. In spite of doing it in the recovery mode, in spite of previously formating the new SSD to make it compatible with mac and following al the steps, there was an error “5342” so I couldn’t make this clone copy from the Macintosh HD to the new SSD. It was related with some partition problem that I couldn’t fix, any ideas on that? it was “osstatus error 5342”
Sorry, no answer but Ive got the same problem.
The issue is the SSD is not correctly formatted:
https://arran.physics.gla.ac.uk/wp/igr-it/2019/03/11/cloning-mac-disk-using-external-enclosure-and-disk-utility/
“We eventually found the problem – the new ssd had been configured with a MBR partition table, not GPT. To fix this go to the View menu and choose Show All Devices. Then select the external device at the top level and click erase. This should allow you to choose MBR or GPT partition schemes.”
Directions above forgot to include an important step when cloning. I kept getting an error trying to restore to new SSD. Turns out the destination drive must first be formated, i.e click Erase and it’ll create a mac volume. Move this volume to destination and click restore. Btw, I used the Restore option when holding down the Option key and powering on.
I’m trying to copy the contents of a 2.5″ hard drive to an APFS volume on my 2012 MacBook pro. When I click on “restore” I get a message that no source is available, despite the hard drive’s appearance in Disk Utility’s sidebar and that I can view the contents and they appear to be okay. I thought that maybe my MBP’s USB was not supplying enough power to do the restoration so I bought a powered HDD docking for the hard drive–same result. Any ideas why the drop down window won’t recognize the hard drive as a source.
I created a bootable clone of my Hard Diak in a MacBookPro and verified afterwards that it is bootable. I changed the HDD for an internal SDD and rebooted from the external Hard disk. So far, so good. Hower Disk Utility won’t let me restore. “Disk is red/weite and can’t be unmounted” Any ideas please?
I could be wrong, but if you go to Get Info (right-click on the HD icon) you can change the permissions and select the drop down with the option on “Apply to Enclosed Folders). That might work.
I noticed the Restore… command while noodling around, then, looking for instructions, landed here. Yhanks, and a question: I notice that the drop down choices for volumes to use as sources includes only the disk, not volumes/ partitions that might be present.
I don’t have a setup that would let me experiment, so not sure how that would work. Say for instance you chose a volume that had two partitions: one had the data you wanted to use, and the other partition had other documents. Not sure what DU would do in this instance.
Now I see why: if the disk is selected then only disks are offered as Restore choices. If a partion volume is selected, then the Restore options include any mounted partitions.
Well done as usual.
Would like to know if pre scanning is necessary for photos?
Great write-up, I always appreciate the additional depth. I am wondering if disk utility can restore to an image file. I have built so much space on my NAS & JBOD, I’d love to use it to host the bootable image for future restore/migration needs.
The Rocket Yard has previously recommended making bootable drives using 3rd party products such as Carbon Copy Cloner. Would you recommend using Disk Utility to do this instead? You could then just use Time Machine and Disk Utility for your backup needs.
Disk Utility’s Restore function is just another tool to add to your bag of backup and archiving tricks. It’s basic in nature, and doesn’t offer some of the more advanced features, such as scheduling, incremental cloning, or sandboxing, that other tools like Carbon Copy Cloner or SuperDuper provide.
Because Disk Utility is included with all versions of the Mac OS, you know it will be available no matter what Mac you’re using. So, when a friend or co-worker is having a problem that requires you to create a disk clone, you’ll always have this method at your disposal.
Tom N.
Disk Utility is good for a one-time backup, not for repeated daily backups where you don’t want to start from scratch every time. Both SuperDuper! and Carbon Copy Cloner support “smart backups” which only update files that have been changed since the last backup. That process will typically be much faster than a full backup.
It’s true that all Mac users already have disk utility, but since they should be backing up on a regular schedule, serious computer users should install either CCC or SD! and set up an automatic backup schedule to protect their data.
Which is faster to just make a simple copy all data from one external drive to another external drive, CCC or Disk Utility? The data I need to copy is 4 TB, and I do not need to make incremental backups or anything like that. I am currently using CCC 4,1 (Safety Net is off) and after 11 hours it has only copied 1.27 TB. MY OS is 10.8.5. Thanks.