

 Have you ever wondered what would happen if your Mac were lost or stolen? Your first thoughts may be about the inconvenience, or the expense of replacement. But when you take a moment to consider what’s likely stored on your Mac, you may realize that someone out there now has detailed information about just about every important aspect of your life, and the cost of replacement just became a secondary consideration.
That lost Mac may contain financial records, including people and businesses you owe money to, or who owe you money, tax information, banking and investment information, social security info, and credit card account data. And we haven’t even mentioned all those emails you’ve sent and received, or your entire web browsing history that’s now in someone else’s hands.
And it’s not just you that’s affected. The dastardly thief will likely find an extensive database of contacts, calendar events, and messaging friends who can now all be contacted and phished more effectively because of the information contained on your Mac.
In honor of the approaching Data Privacy Day on Jan. 28, we’ve put together a guide to FileVault on Mac.
FileVault
One of the best defenses for preventing unauthorized access to your Mac’s data is to encrypt the information so that no one can access it without knowing a secret passphrase.
Apple has included a file encryption system since OS X Panther. The original version was somewhat basic, only protecting a user’s home folder, which didn’t always contain the information that needed protecting.
FileVault 2
In 2011, Apple replaced the FileVault system with a new full disk encryption scheme with the imaginative name of FileVault 2. When enabled, this new system can protect every bit of information on your Mac’s startup drive. With a bit of fiddling by the user, additional drives, either internal or external, can also be encrypted using the same technology, making your Mac, and all the information it contains, safe from most attempts to access the data.
Encryption
FileVault 2 uses a 128-bit AES (Advanced Encryption Standard) encryption algorithm, and a 256-bit key to encrypt and decrypt the disk. Access to the encrypted data is provided via the user’s password or a recovery key that is generated at the time FileVault 2 is set up.
The initial full disk encryption is performed in the background after FileVault is enabled, allowing you to continue to use your Mac while the encryption is taking place. After that, file encryption and decryption are performed on the fly, as files are accessed and saved.
Enabling FileVault 2
Before you turn FileVault 2 on and encrypt your startup drive, make sure you have a current backup, preferably a clone of the startup drive that you can use to boot your Mac from should a problem occur during the initial encryption process.
Launch System Preferences, located in the Dock or under the Apple menu.
Select the Security & Privacy preference pane.
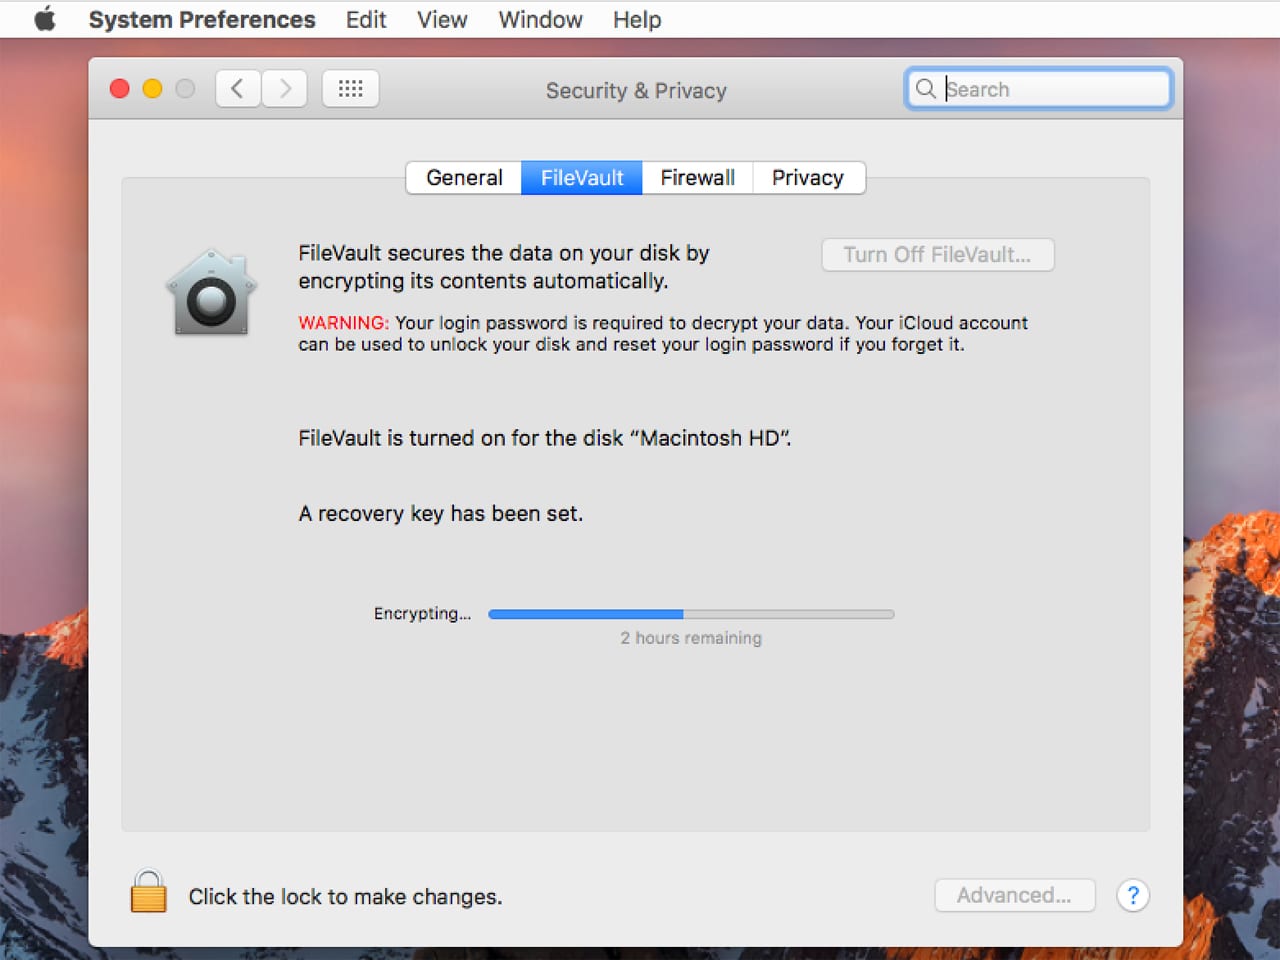
Select the FileVault tab.
Click the lock in the bottom left corner of the preference pane.
Provide your administrator password.
Click the Turn On FileVault button.
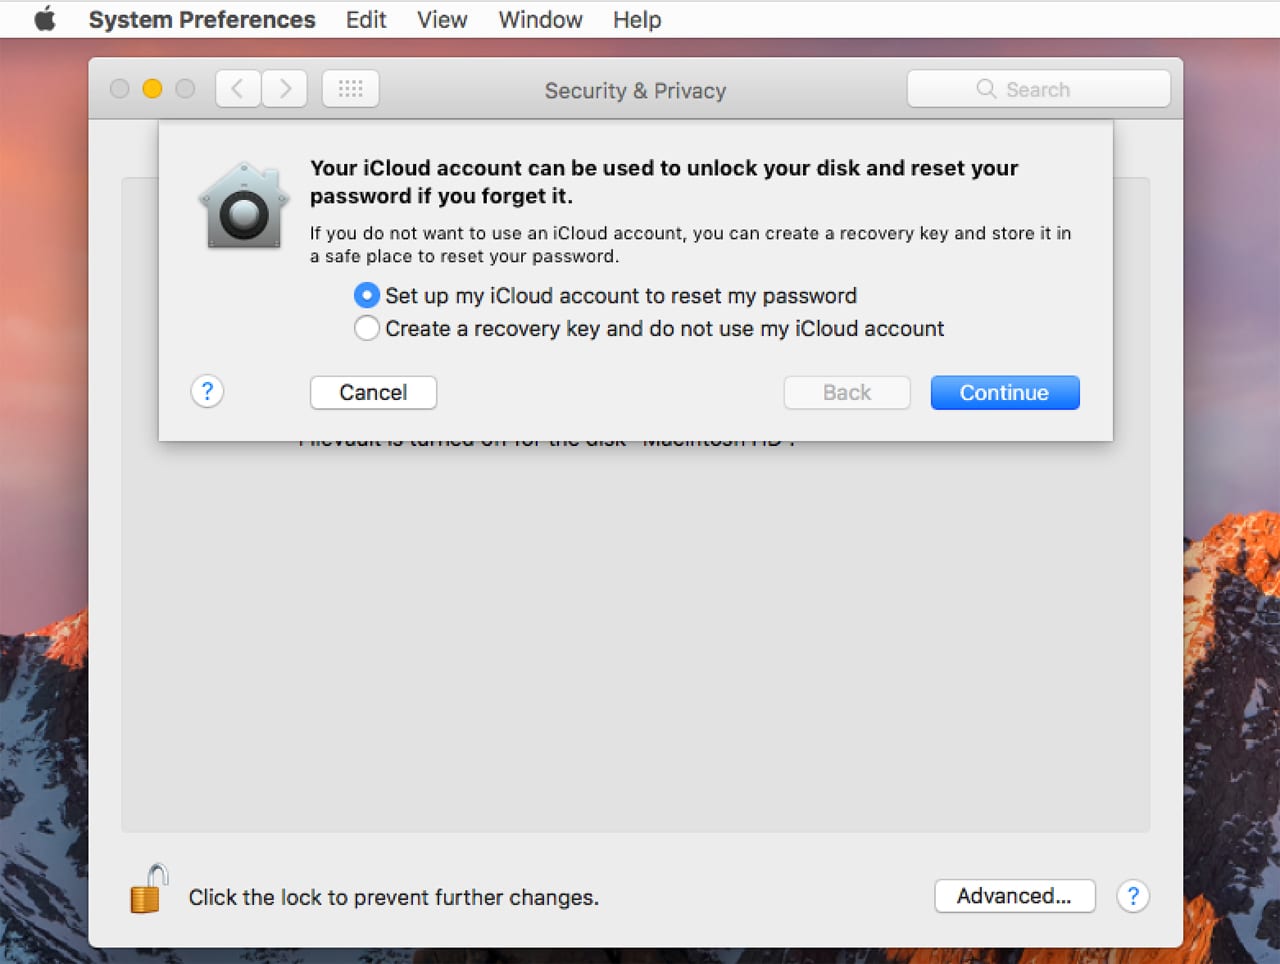
A sheet will drop down, offering two methods of acquiring a recovery key. The recovery key is used to unlock an encrypted startup disk should you forget your login password.
The first method stores the encrypted recovery key in your iCloud account, which you can access with your Apple ID. To gain access to the recovery key via iCloud, you may need to supply the answers you provided to three questions during the setup of your Apple ID. If you don’t remember the security questions, go to the Apple ID management page and change your security questions before proceeding.
The second method creates the recovery key and displays its value directly to you. You must copy the recovery key down, and store it in a safe place. Do not store the recovery key on your startup drive; remember, the drive will be encrypted, preventing you from accessing the encrypted recovery key should you need it. A secure place in the home, such as a safe, is a good choice.
Make your choice, and then click the Continue button.
Set up my iCloud Account to Reset my Password
If you’re not already signed into iCloud, an iCloud sign-in window will be displayed; supply your Apple ID and password.
You’ll be returned to the sheet where you can choose to store the recovery key in iCloud or have it displayed directly to you. Select “Allow my iCloud account to unlock my disk” and then click Continue. Jump ahead to Adding Additional Users, below.
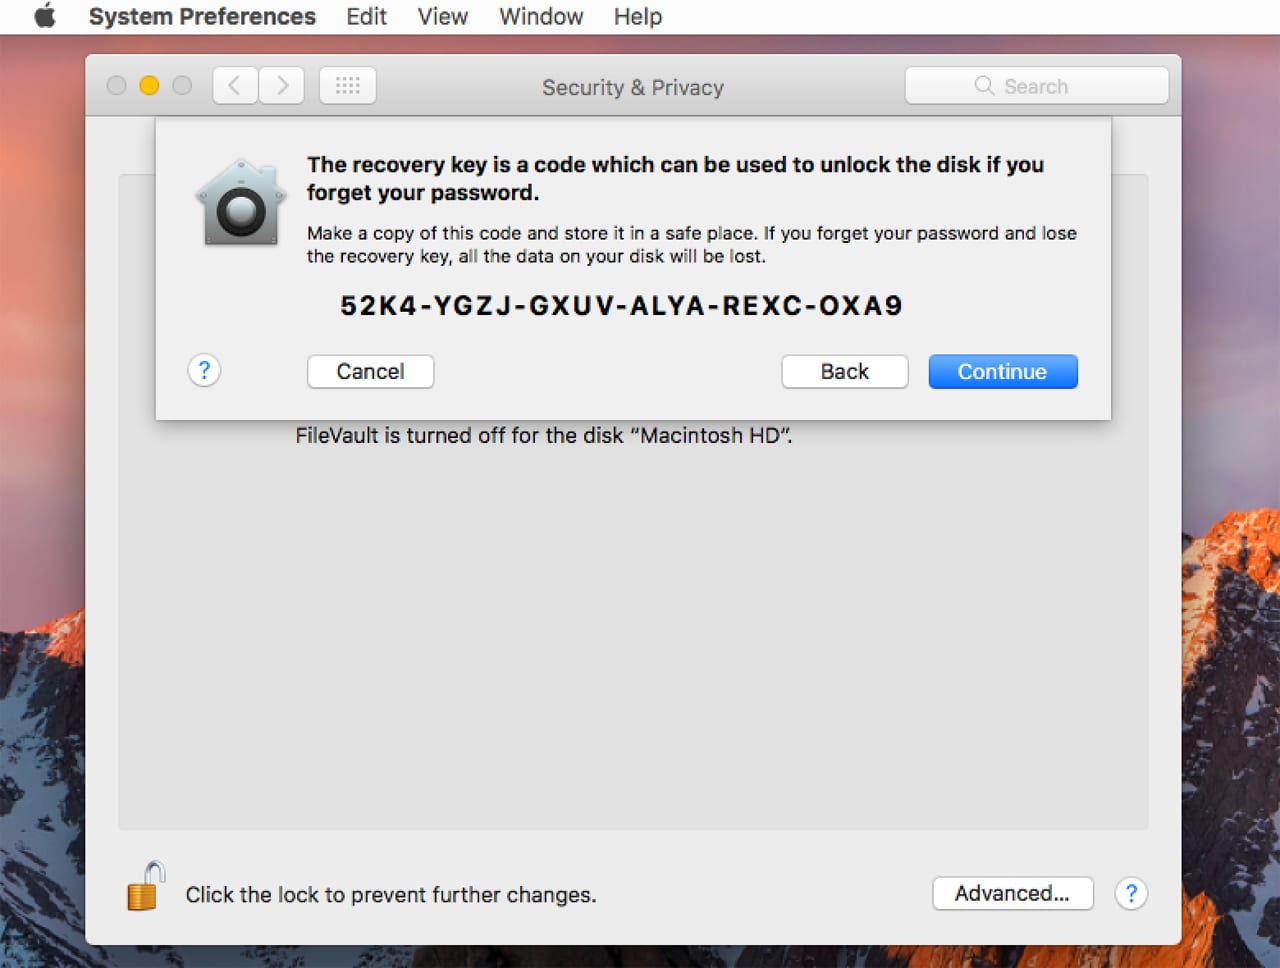
Create a Recovery Key and do not use my iCloud Account
This is the second choice provided by FileVault for generating an emergency recovery key. In this case, the recovery key is provided directly to you and isn’t stored within your iCloud account.
Make this selection, and then click the Continue button.
The sheet will change and display your recovery key. The recovery key is six sets of four characters separated by a dash. If you ever forget your password, the recovery key can be used to gain access to the encrypted startup drive and reset your password.
Be sure to write down the recovery key and store it in a safe place. Better yet, take a screen shot that you can print out and store in a safe place. Don’t store the recovery key information on your Mac’s startup drive, since the drive will be encrypted, preventing you from accessing the data should you forget the password.
Click the Continue button.
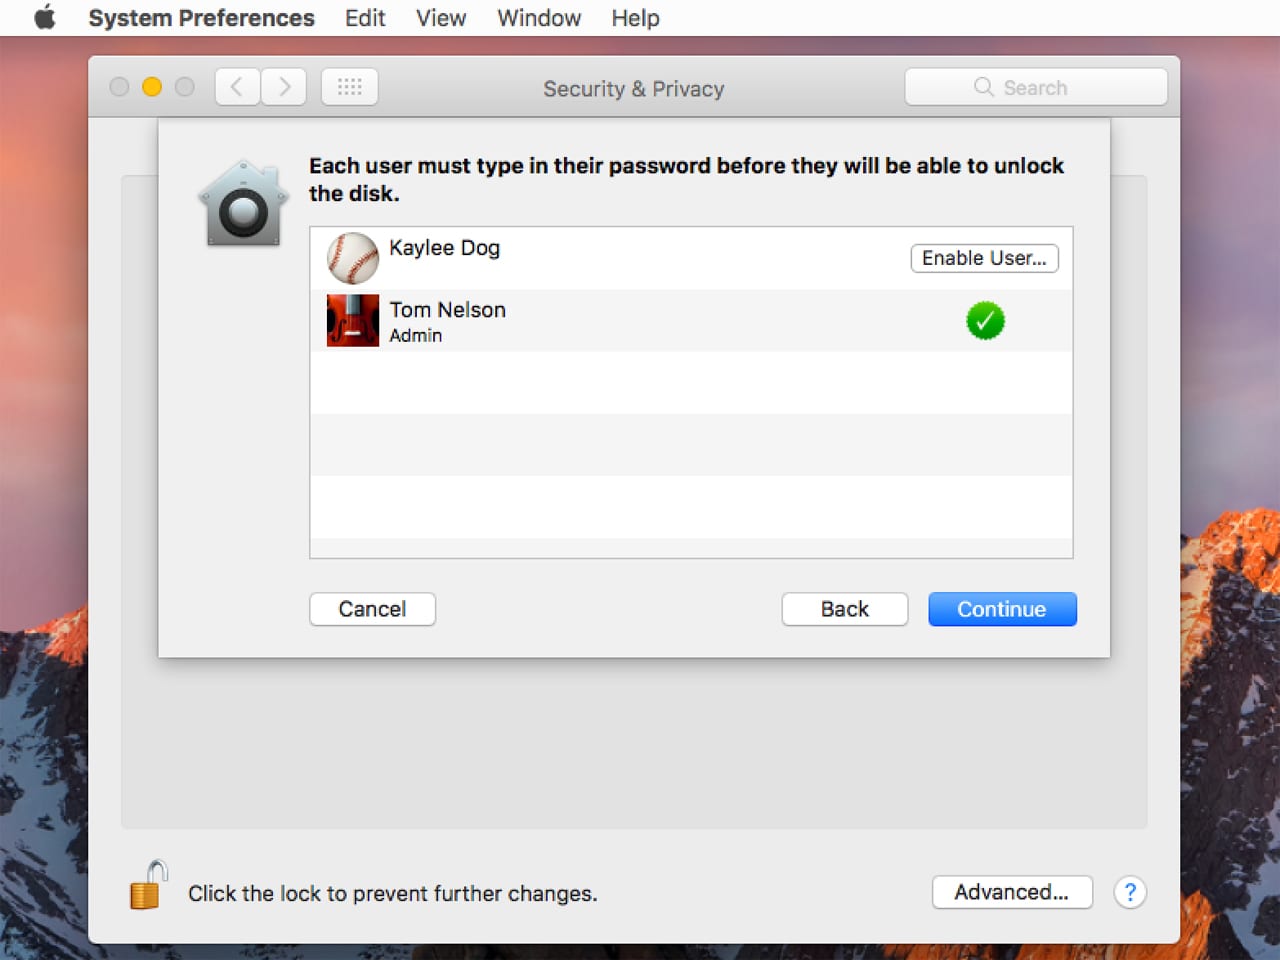
Adding Additional Users
A sheet will display allowing you to enable other user accounts on your Mac to unlock the encrypted startup disk. Unless you plan on always starting up your Mac for every user, it’s a good idea to allow other users the ability to start up and use the Mac.
You can allow other user accounts to start the Mac and access the encrypted drive by clicking the Enable User button next to each account name, and providing the account’s password.
Make your choices and when ready to proceed, click the Continue button.
Your Mac needs to restart to begin the encryption process. Click the Restart button.
Once the Mac restarts, you can sign in with your user account and continue to use your Mac while the encryption process is underway.
Encryption Status
During the initial encryption process, or if you decide to disable FileVault in the future, the Security and Privacy preference pane will display a status bar and estimated time remaining for encryption or decryption under the FileVault tab. Depending on the age of your Mac, you may notice a bit of sluggishness during this initial process. Once the entire drive is encrypted or decrypted, your Mac should return to its normal responsive self.
Reset with Recovery Key or Apple ID
If you should ever forget your login password, you can reset it using the recovery key that was created when you enabled FileVault. To start the reset process, restart your Mac so the login screen is displayed.
Select your account from the login choices, and then click the question mark button to the right of the password field.
Your password hint will be displayed; hopefully this will be enough to jog your memory and you can enter the password and continue using your Mac. If it isn’t, you can reset the password using the recovery key or your Apple ID, depending on the choice you made when you enabled FileVault. Click the button next to Reset if using the Recovery Key, or reset it using your Apple ID.
Reset with Recovery ID
The password field will expand and change to say Recovery Key. Enter your recovery key. The recovery key field isn’t case sensitive, and it will insert the dashes between the key groups for you. Once the key is entered, hit return or click the right-facing arrow at the end of the field.
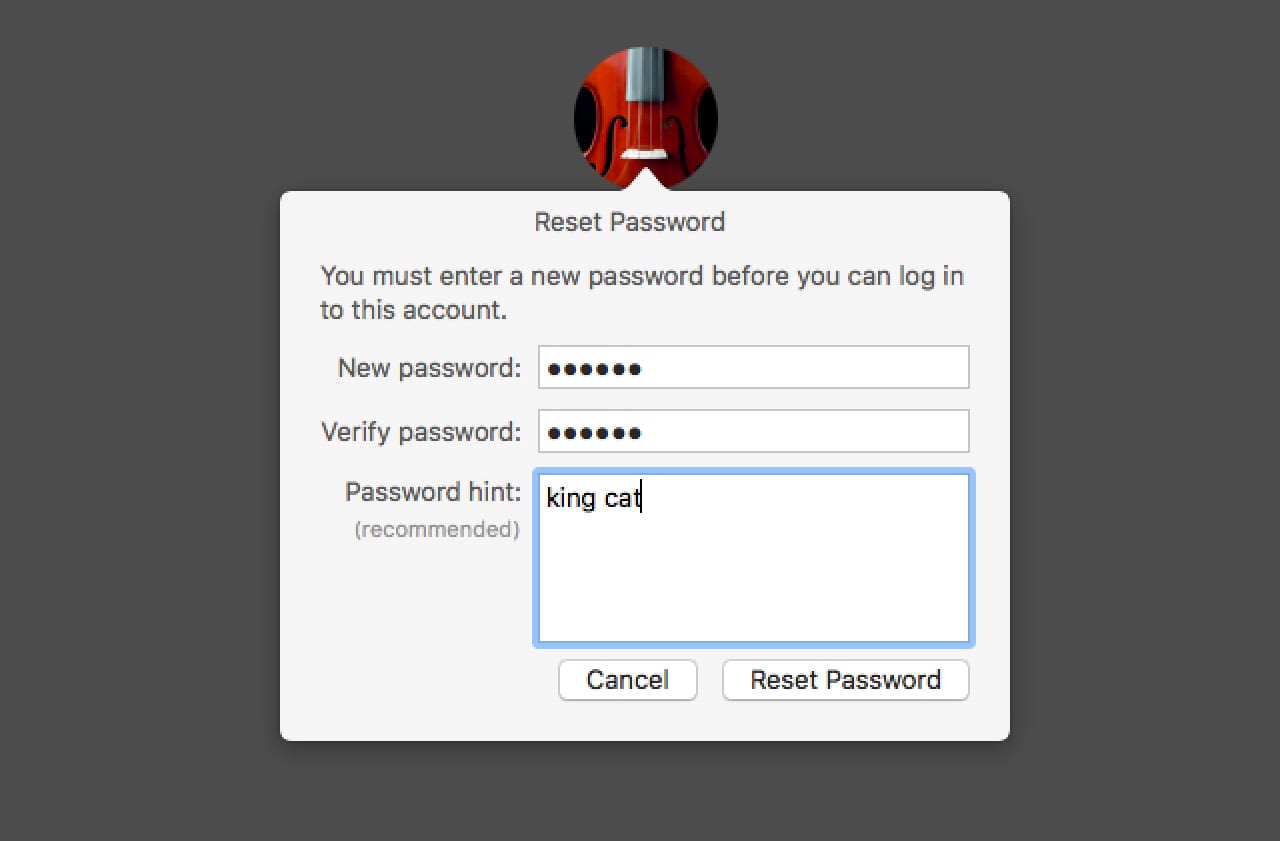
Your Mac will reload the login window and display a reset password form. Fill in the form with a new password for your account, along with a password hint, and then click the Reset Password button.
The desktop will load; you can continue to use your Mac and all the encrypted data on the startup drive.
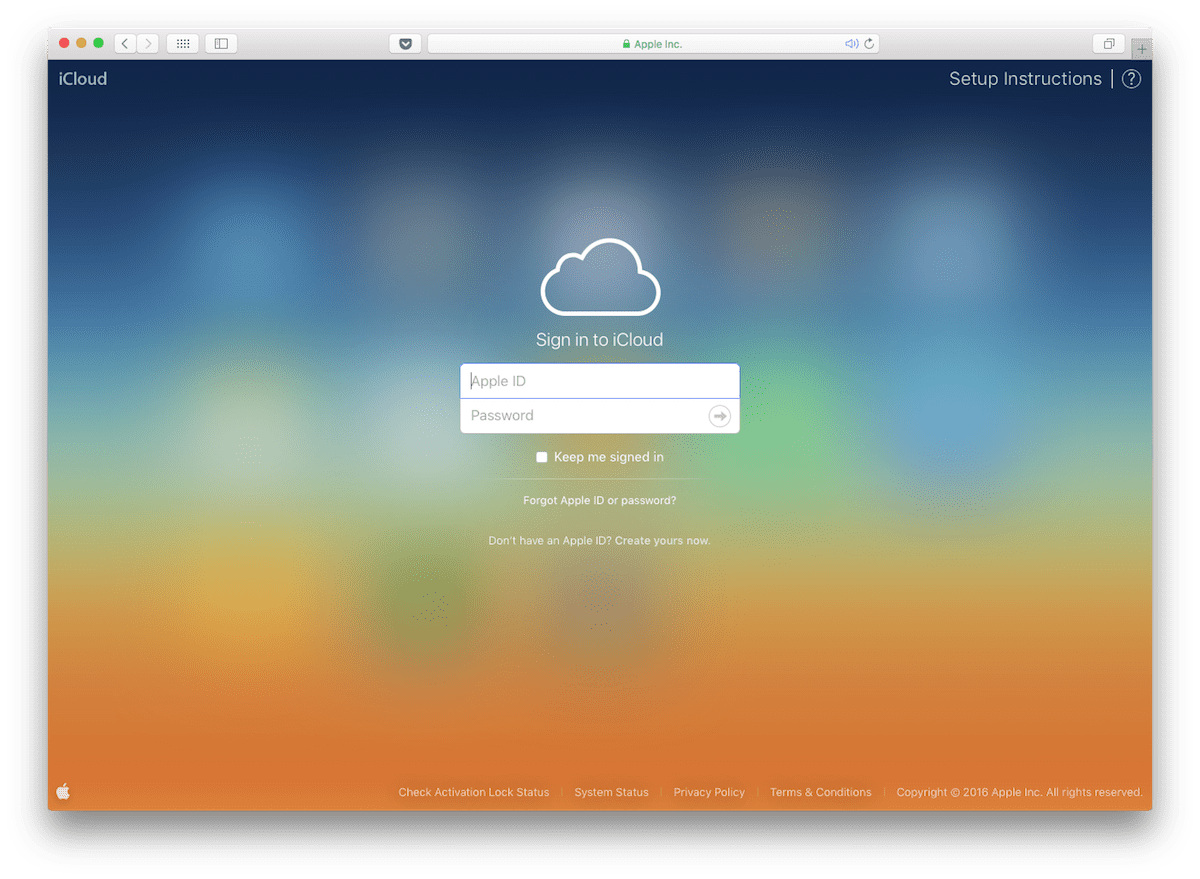
Reset with Apple ID
Your Mac needs to have access to the Internet for this method to work. The Reset Password window will load. Enter your Apple ID and password, and then click the Next button.
Your Apple ID will be verified and the Recovery Key will be extracted from your iCloud account and automatically entered for you. You can now enter a new password and password hint.
Provide the password information, and click Next.
Your FileVault volume password has been reset. You may now reboot your Mac; click the Restart button.
Encrypting Additional Drives
FileVault takes care of your Mac’s startup drive, but you likely have one or more additional drives you may wish to protect.
If you’re using Time Machine, you can enable encryption within the Time Machine preference pane by selecting the Select Disk button and placing a checkmark in the Encrypt Backups check box. You’ll be asked to create a password for access to the encrypted data.
Note: If you’ve been using an unencrypted disk for Time Capsule (Network Attached Storage) backups, Time Machine will first erase the selected drive before encrypting it. You’ll lose all previously stored data, including the backups, on the NAS.
Other drives can be encrypted from the Finder. Right-click on the disk you wish to encrypt and select Encrypt “Disk Name” from the popup menu. You’ll be asked for a password to enable access to the encrypted disk.
Encrypting the data on your Mac provides a safer computing environment at very little cost to you, other than the time it takes to perform the setup. Macs older than 2011 may experience a slight performance penalty for using FileVault, but newer Macs should work just fine with full disk encryption.


Just for clarity — if I turn on file encryption for our Time Capsule, all the previous backups will be erased? Thanks!
What about any effect on performance with encryption enabled? Having a mid 2011 older Mac, that would be my concern. I realize the initial encryption process will cause a hit. What about use once encrypted? Any metrics on before and after?
I you think that FileVault is not really needed on a desktop locked up at home, bear in mind that if you need to return a drive under warranty you may not be able to first erase it (this has happened to me twice). Having the drive encrypted with FileVault solves the problem
I use this on my laptops, but have found it to be a problem on headless Mac mini’s that I use Apple Remote Desktop to access. If they are power cycled, you cannot attach to them unless you login locally, which is a problem when there is no keyboard, mouse or monitor attached. Hopefully the new AFS will address this.