

 You’ve been diligent about maintaining up-to-date backups of your Mac’s data by using Time Machine, but there’s a nagging worry in the back of your mind. How do you know the backups are any good?
That’s a good question, and one we should all ask about our backups. There are a number of ways to make sure your Time Machine backups are in good shape, and we’re going to cover most of them in this guide.
Before we move on to checking the state your backups are in, there’s an important demarcation in Time Machine technology to be aware of; a line in the sand, if you will. Time Machine backups created in OS X Yosemite and earlier have a more limited means of testing backups than those created in OS X El Capitan and later. We’ll include notes about which version of the Mac OS the verification method works in. With that out of the way, let’s get started.
Verify Your Time Machine Disk
Before we attempt to verify files on a Time Machine backup, it’s a good idea to make sure the Time Machine disk doesn’t have any issues. Start by turning Time Machine off, and then use Disk Utility’s First Aid to verify that your Time Machine disk is in good shape. If any errors are noted, use Disk Utility’s Repair Disk option, as outlined at the link above. (Need dedicated Time Machine storage? Check out these external solutions to find the perfect drive for your Mac.)
The Eyeball Method of Checking Time Machine
This somewhat simplistic way of checking on the status of your backups is performed by using Time Machine to restore a file or two, and then checking (eyeballing) the files to see whether they seem to be intact. Before you complain that this way doesn’t seem very reliable, you’re absolutely right, but it does provide a quick and easy way to verify that the basics of Time Machine and your backups are indeed working.

The eyeball method will work for any version of Time Machine or the Mac OS. The only prerequisite is that you have a Time Machine backup in place on your Mac:
Enter Time Machine by either selecting Enter Time Machine from the Time Machine menu item, or launching the Time Machine app located in the /Applications folder.
Use the arrow in the Time Machine window to go back to an earlier time.
In the Time Machine Finder window, right-click a file and select Restore “file name” to… from the popup menu.
Time Machine will close.
After a moment you’ll be presented with a standard Finder Choose window to select a location to save the Time Machine file to. Browse to a location where you wish to save the file, and click New Folder. We highly recommend creating a new folder to restore to because a bug exists in some versions of Time Machine that causes all files that occupy the same folder as the selected file to also be restored. Restoring to a new folder will isolate the file if the bug occurs.
The file will be restored to the new folder location.
Open the restored file and examine it to make sure it’s in proper shape. This can be as simple as looking at the contents of a document, viewing a restored image, or checking file size and creation date.
If the file or files look good, and there were no disk errors noted when you ran Disk First Aid, then you can be pretty sure that your Time Machine backups are in good shape.
Note: If you did have errors when you used Disk First Aid, it may be time to look into replacement drives. Unlike other storage media we use, we recommend not tolerating drive errors on backups.
Verify Backups on Time Machine Drives
Verify Backups is a function built into Time Machine since 2009, when the first Time Capsule was released. Verify Backups will work for all versions of Time Machine and the Mac OS since Snow Leopard.
But before you say, “Yippee! An easy way to verify my backups!”, the Verify Backups feature only works for Time Capsules, NAS (Network Attached Storage) that supports Time Machine, or external disks attached to a Mac on your local network that can be mounted on your own Mac over the network. If your Time Machine backup location meets one of the above criteria, you can run the verify function by doing the following:
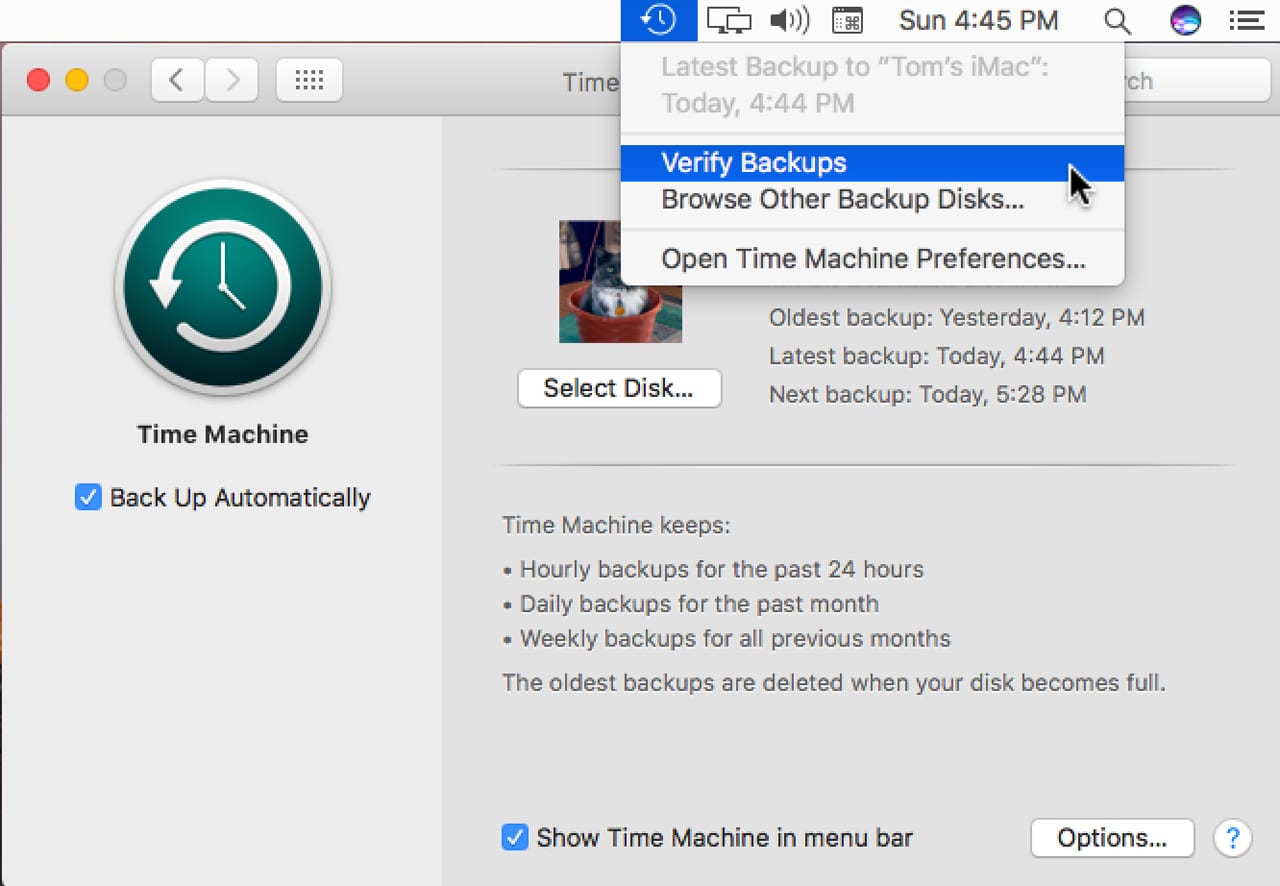
Make sure Time Machine is available as a menu bar item. If not, open the Time Machine preference pane and select the Show Time Machine in Menu Bar option.
Hold down the Option key and click the Time Machine menu bar item.
The Verify Backups option should be displayed. If the option is grayed out, it’s because your Time Machine disk doesn’t meet the requirement to be a Time Capsule, NAS, or remotely mounted external disk.
Select the Verify Backups item.
Time Machine will start the Verify function. You can observe the status of the Verify process by opening the Time Machine preference pane; a status bar will display the progress. If an error is discovered, Time Machine will let you know; otherwise, no information is provided, following the age-old adage that no news is good news.
Compare Backups With tmutil
This next method for verifying a Time Machine backup can be used in place of the Verify Backups method we just covered. It will work for any type of Time Machine backup, not just those involving a Time Capsule or NAS, and it will work for any version of Time Machine or the Mac OS.
Unlike Verify Backups, the Compare function is run from Terminal, using the tmutil command. It provides a file-by-file comparison of the most recent backup on your Time Machine drive with the current state of your Mac. As such, it would be very rare for the compare function to achieve a 100 percent match, since there are almost always files on your Mac that are being updated behind the scenes.
Launch Terminal, located at /Applications/Utilities.
Enter the following at the Terminal prompt:
sudo tmutil compare -s
The -s option forces tmutil to only compare file sizes. You can have the compare function check many additional file parameters, but since the compare is done file-by-file, the time it takes can be excessive; limiting it to file size helps trim the time and still provide reasonable results. Even so, depending on the size of your backups, the compare command can take 20 minutes to a few hours to complete.
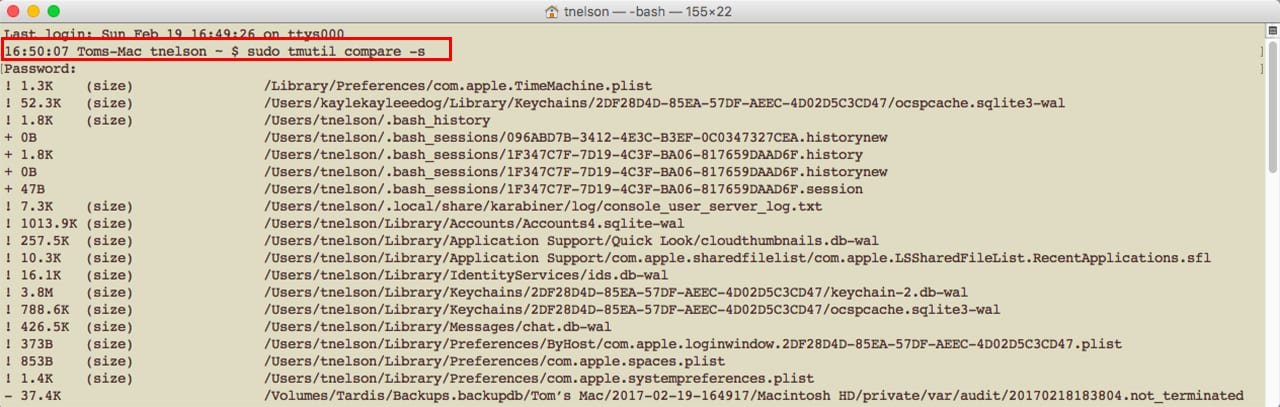
! (file size) /Path to file: The exclamation point (!) indicates a difference in file size between the backup and the file on your Mac.
+ (file size) /Path to file: The plus sign (+) indicates a new file that is not present in the backup.
– (file size) /Path to file: Indicates a file that has been removed from your Mac but is still present in the backup.
The problem with the Compare command is that it’s time sensitive. As time increases between when a backup occurred and the present time, more and more files will show differences. So, while Compare can work as an indicator when used right after a backup, it quickly becomes less helpful as time goes on.
Verify Checksums (OS X El Capitan and Later)
Starting with OS X El Capitan, Apple added a method of verifying files in the Time Machine backup by comparing checksums created by Time Machine when the files were backed up to a checksum computed of the actual files in the backup.
This is a file-by-file comparison, so the process can take quite a while. The tmutil function will only generate errors and warnings when a problem occurs. If the backups match the stored checksums, the command just terminates, with no output.
The command takes the form:
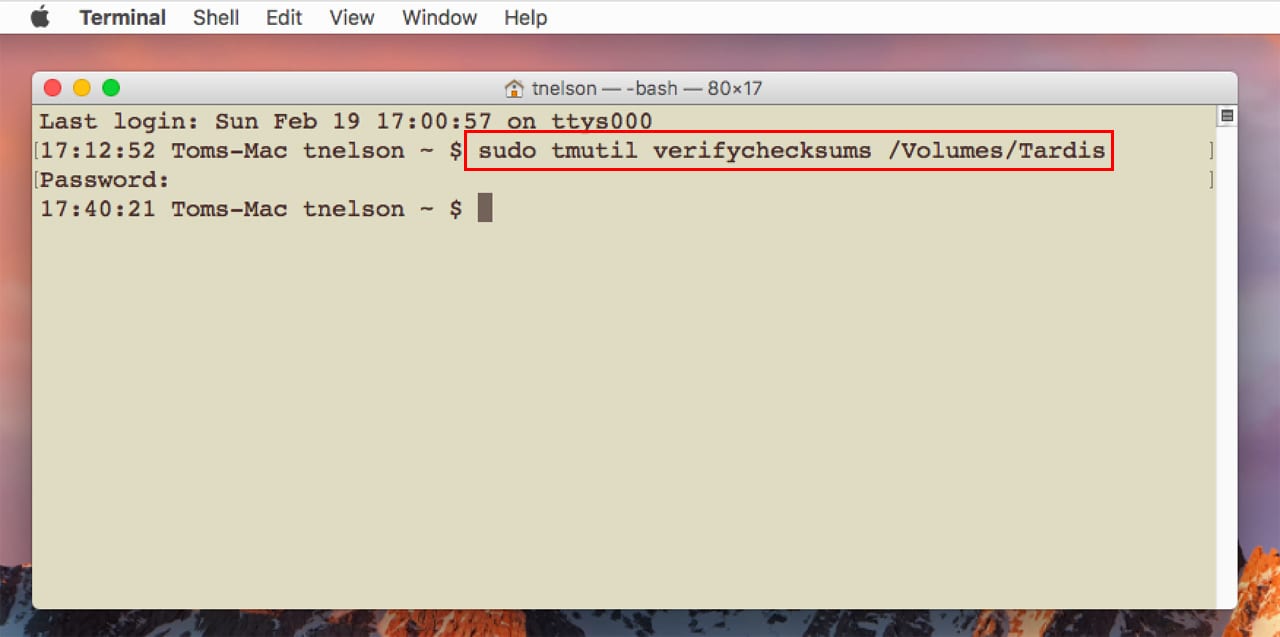
sudo tmutil verifychecksums /Path to backup drive. As an example, if I wished to verify my Time Machine drive, which happens to be named Tardis, the command would be:
sudo tmutil verifychecksums /Volumes/Tardis
If you’re not sure of the path to your backup drive, you can enter the first part of the command (sudo tmutil verifychecksums), and then drag the Time Machine drive into the Terminal app. The actual path to the drive will automatically be entered.
Note: When using the drag technique to enter the path, an extra space will likely be inserted at the end of the path. Be sure to remove the extra space before executing the command. Failure to do so can cause error messages about failure in enumerating the path.
Launch Terminal, if it isn’t already open, and then enter the following at the Terminal prompt:
sudo tmutil verifychecksums /Path to backup drive
Be sure to replace the /Path to backup drive with the actual path to your Time Machine backup.
Execute the command by pressing enter or return.
Note: If the Time Machine backup you’re checking was originally created with OS X Yosemite or earlier, then even if you’re checking under a more recent version of the Mac OS, the verifychecksums option in tmutil won’t work, and will just return errors.
The verifychecksum option in tmutil will return to the Terminal prompt if there are no errors, essentially providing no confirmation text of any kind. If, on the other hand, there are issues, Terminal will print out messages indicating the type of errors it found.
When to Verify Time Machine Backups
You probably don’t need to verify backups every time Time Machine runs. But verifying Time Machine when you first set up the backup system, change backup drives, or make some other type of change to your Mac or its backup system may be a good idea. And of course, if you’ve never verified your backups, this is a good time to give it a shot.
Related article: Yes, You Can Use One Drive for Time Machine and File Storage


Verifying a backup when you run the first backup – or if you have not ever done so before – is not nearly enough. Absolutely not. Terrible idea to limit it to that.
I know you didn’t say that you shouldn’t verify more than that but the trouble is humans are lazy and when you add in ignorance it’s even worse. How can you fix a problem if you don’t even know it’s a problem?
And there’s the Dunning-Kruger effect. people think they know enough but they actually do not know enough to understand that they do not know enough. In addition if you’re unaware of something you’re not only unaware of [that thing] but you’re also unaware that there is something to be aware of in the first place (yes there is a difference albeit it might be too subtle for many people).
The thing is users tend to go for the easiest way and if they see that their data is fine now they won’t bother in the future because after all everything is working as it should. Until.. it doesn’t, that is.
Regularly test your backups. To not do so is a terrible, terrible mistake. A backup that is corrupt is useless – unless you want to try repairing it but not only is that a waste of time (if you were to verify your backups regularly) but it’s something that takes a fair bit of knowledge and experience to do. And what if the backup actually is utterly gone? There are other possibilities.
I would suggest kindly that you update your article to account for this (by suggesting people verify their backup every few backups would be a huge step forward). And while on the subject of backup integrity…
Time Machine devs I am sure have good intentions with their automatic backup at a 1 hour interval – but this is also a terrible idea. A backup volume that is always accessible (and critically writable) is in peril. Not only is there human error but there is a chance that a process innocently causes a problem. There is also the possibility of malicious actions. If you cannot make the files immutable (and file permissions don’t count here because processes run with the level of privilege that is used – and also user error) then the volume should not be mounted except when you’re doing the backup.
How long might I expect the verifychecksums command to take? My 8Tb drive is 5Tb utilised and the verifychecksums has been running for 6-days. Whilst there is no indication of progress the external drive is being accessed and I can hear/feel the heads moving so reasonably confident it is still doing something. How patient should I be? Thank you for your help.
try this at terminal:
sudo sysctl debug.lowpri_throttle_enabled=0
renice -n -20 -p $(pgrep TimeMachine)
Thank you, I just left my Time Machine running and doing whatever it was doing and eventually (Nearly two weeks if I remember correctly) it finished and and has carried on backing up hourly as normal – all have been well since.
I have saved these commands for next time! Thank you
This tutorial reminded me of a question I’ve always wondered about. Exactly how many Mac users have named their Time Machine Volumes Tardis?
Fortunately, I do indeed backup to a local Mac OS Server, so Verify Backups is a live option for me.
But every time I try to use it, I get this message within about five seconds:
Time Machine couldn’t verify your backups on “Village Server” because verification was interrupted.
Interruptions are usually caused by network problems. Try again after the network problems are resolved.
There are no network problems. The server is two feet away from my MacBook, cabled to the same router.
I get this message whether or not I have the remote Time Machine volume locally mounted on my MacBook (your article mentions “external disks attached to a Mac on your local network that can be mounted on your own Mac over the network” but never specifies whether you need actually mount them to perform this operation, so I tried both ways).
More modern Apple stuff that doesn’t “just work.” :-(
Thanks for this. It is good info.
Great tutorial !
I have never checked my backup and have not seen this procedure documented anywhere else like this.
Im glad I checked as there were some issues which I resolved. Better off being proactive then reactive and lost . Thanks for posting this.
Please do something less complicated! I use TM regularly and the MacBook 10.9.4 has got a screen problem. I’ve got hold of another with 10.7.5 but the frustration is I can’t access any Mail and other files stored in the Library. Upgrading the 70gb early 2008 7.5 machine to 9.4 hardly an option. The exernal is a 1 tb divided into three, but the TM appears to have saved to all three sectors, overwriting stuff. Am in a potential muddle.
Good tip, thanks! When I run a long job like this, I usually redirect ‘>’ output to a file in /tmp, and background the process using a trailing ampersand.