

 If you’ve just purchased a new Mac, or upgraded your current model to run macOS Mojave, you may be wondering what apps and utilities come with the new OS.
You’re likely already familiar with many of the more common apps included, such as Mail, Safari, FaceTime, Calendar, Contacts, and many more. Less well known, but deserving of a look, are the included utilities that can be used to assist in troubleshooting problems, expand the capabilities of existing services, or help in managing or executing routine tasks.
Five Utilities Included with macOS Mojave
We’re going to concentrate on just five of the many utilities included with macOS Mojave. Some of the utilities predate Mojave, and have been around for quite some time, while others are new to Mojave. The five utilities were chosen as representative of the type of tasks you may need to undertake, but didn’t know that macOS could give you a hand with them.
You may want to take a look at: New to Mac? Here are 5 High Sierra Utilities You Should Know About to see some of the utilities we have highlighted in the past. But for now, let’s move on with our utility roundup for macOS Mojave.
Text Expansion
Unbeknownst to many is a simple text expansion capability built into the Mac. Text expansion allows you to define a phrase, abbreviation, or any other collection of easy-to-remember text, and have your Mac expand the text shortcut into a longer phrase. This can be as simple as using the text shortcut “Myem” to automatically expand to become your full email address. You can also use text expansion to add special characters, such as the copyright symbol, by typing a simple shortcut instead of searching through the Character Viewer (another useful utility) to copy/paste the copyright symbol (©) into a document you’re working on.
You can find the text expansion utility by launching System Preferences, which can be found as an icon in the Dock, or by accessing the Apple menu and selecting System Preferences.
Once the System Preferences window is open, select the Keyboard preference pane.
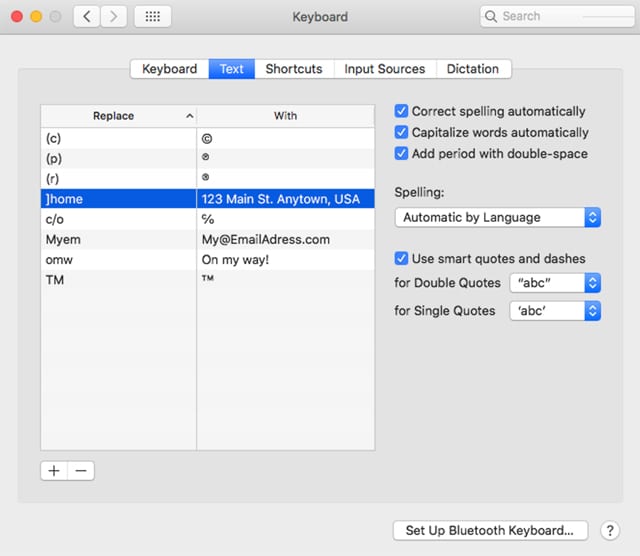
Select the Text button along the top of the Keyboard preference pane window to open the text expansion and spell checking services built into your Mac.
You should see a number of example text expansions already included, such as the copyright symbol expansion and email address expansion mentioned earlier.
To edit an existing item, double-click or tap the text you wish to change, such as the example email address in the email expansion item. Once selected, you can replace the default My@EmailAddress.comtext with your actual email address.
To add a new text expansion item, click or tap the plus (+) sign, then enter the shortcut text you wish to use for the expansion. It’s a good idea to use a shortcut that you’re not likely to type in normal everyday use. One trick is to precede the shortcut with a character you rarely use, such as the left or right bracket. As an example, if you wished to have a shortcut to enter your home address, you could use ]home instead of the very common word home.
To complete adding a new text expansion, double-click or tap the “With” column for the text expansion you’re adding, and enter the full text you wish to have replace the shortcut text.
To delete an existing text expansion, select the expansion and click the minus (-) button.
Automator/Quick Actions
Our next utility is also an older one: Automator, the handy app for creating custom workflows and automation of repetitive tasks. We covered using Automator in a previous Rocket Yard article: macOS 101: How to Automate Tasks on Your Mac.
We’re revisiting the Automator utility because of two new capabilities introduced with macOS Mojave. First, Automator is now able to create Quick Action items, and second, the new Finder Quick Action feature of Mojave allows you to access an Automator action.
Let’s consider an example:
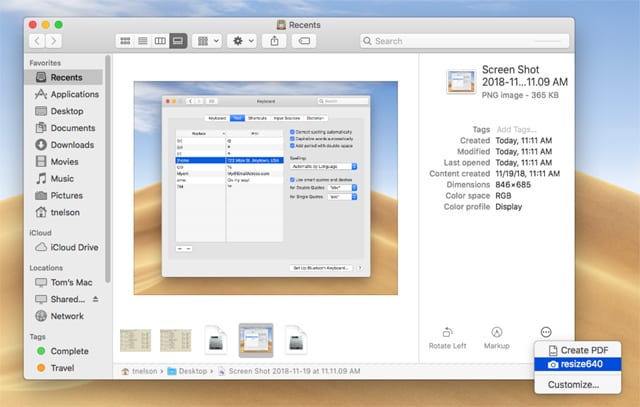
One of the tasks I need to perform routinely is to resize an image to fit the space requirements in the Rocket Yard blog. With Automator, I can automate the process of resizing an image, which saves me from performing multiple steps: opening an image in my favorite photo editor, resizing the image, and then saving the resized image to a new file. When I combine the automated task I just created with Mojave’s Quick Actions, I only need to open a Finder window on the folder that contains the images I want to work with, select one or more images, and then pick the Quick Action I created in Automator, and my resizing chore is completed for me.
You can find details, including how to create an Automator action for resizing photos, and how to use that Automator task with Quick Actions, in the article: A Guide to Quick Actions in macOS Mojave
Network Utility
This handy troubleshooting utility can help you find the culprit when your network is acting up and preventing you from connecting to the Internet, access a specific website or Internet service, or troubleshoot a number of network problems you may encounter.
Network Utility can perform common networking tasks, such as Lookup, Traceroute, Ping, Whois, Finger, Port Scan, and Netstat, as well as provide general information about the status of your network connection, all in one easy-to-use utility.
You can access Network Utility by selecting About This Mac from the Apple menu. In the window that opens, click or tap the System Report button.
With the System Information app now open, select Network Utility from the Window menu item.
There’s quite a bit of information, as well as network testing capabilities, in the Network Utility you just launched. So much so, that you may want to add the utility to the Dock, for easy access in the future. Right-click the Network Utility icon currently showing in the Dock, and select Options, Keep in Dock.
For a complete look at the capabilities of Network Utility, I suggest reviewing: Rocket Yard Guide: Using macOS Sierra’s ‘Hidden’ Network Utility.
For those of you who need to troubleshoot common network issues, these three functions of the Network Utility may be the most helpful:
Info: This tab gives you a quick look at the selected network interface listed in the dropdown menu. You can select from different network ports that your Mac may be using. Important information displayed includes IP Address, Link Speed, and Link Status. This lets you see at a glance if your network connection is functional. You’ll also see transfer statistics, showing how many network packets were sent and received, as well as the number of packet errors and network collisions that have occurred.
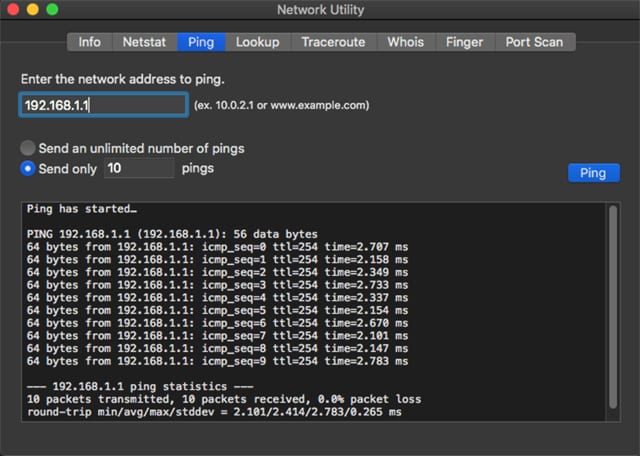
Ping: This utility allows you to test if your Mac is able to make a connection to another network device. You need to know the IP address or host name of the connected device. Once you enter the information, your Mac will send a ping, sort of like shouting out, “Hello, anyone home?” and then waiting for the response.
The Ping utility will log how many pings you send, and whether there was a response, as well as how much time elapsed between the ping and the response. In this way, you can use ping to check that you can connect to a specific device, as well as have a rudimentary idea of the quality of the connection.
Traceroute: This may be the most often used utility; it can trace how a packet sent from your Mac makes its way to the destination. You’ll use Traceroute most often when you’re having trouble connecting to a network device or service. It can show you where your packets are getting lost; is it the destination network device, your home router, the IPS you’re using, or somewhere in-between?
Traceroute can help you understand where the connection problem is occurring and, hopefully, who to talk to about fixing the issue.
Wireless Diagnostics
If you’re connected to your network using Wi-Fi, and Network Utility showed you were having issues connecting to your local router, chances are you have a Wi-Fi problem, just the issue that our fourth utility, Wireless Diagnostics, was made for.
Wireless Diagnostics can help you when you can’t connect to your Wi-Fi system, have slow connections using Wi-Fi, or have intermittent performance issues that are likely Wi-Fi related.
You can access Wireless Diagnostics by holding down the Option key and selecting Open Wireless Diagnostics from the Wi-Fi item in the Menu bar. If you don’t have Wi-Fi set to show up in the menu bar, you can launch Wireless Diagnostics by opening a Finder window and navigating to /System/Library/CoreServices/Applications and double-clicking or tapping the Wireless Diagnostics app in the folder.
Once the Wireless Diagnostics app opens, ignore the Introduction window as well as the Continue button. Instead, you’ll find much more usable tools within the app’s Window menu; specifically, the Info, Scan, and Performance items.
Info: Displays the current information and status of your wireless connection. You can find out the network name of the Wi-Fi connection point you’re connected to, as well as the type of connection, how well it’s performing, the channel you’re using, noise level, the IP address in use, and more.
Scan: Use Scan to show nearby Wi-Fi access points, protocols supported, and which one of them you’re connected to.
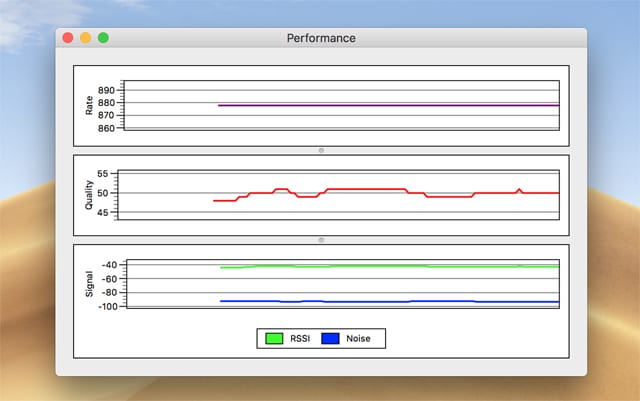
Performance: This will display an almost real-time graph of your connection, displaying the speed of your connection, the quality, and both the signal level and noise level. You can use the Performance graph to optimize the position of an access point on your Mac in order to achieve the best connection.
Screenshot
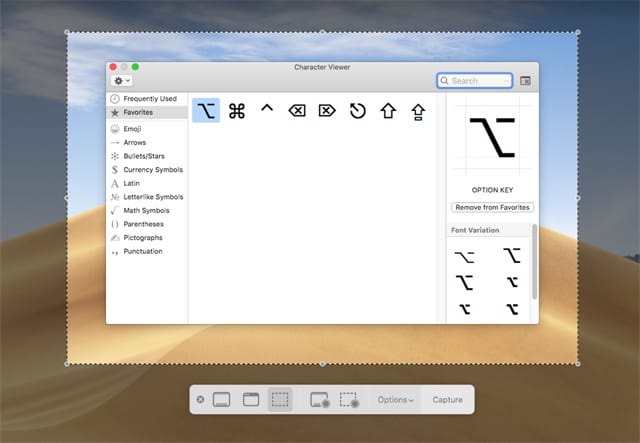
One of macOS Mojave’s features is a new screenshot utility that can be used for taking screenshots, and creating screen recordings, as well as marking up screenshots with annotation tools, such as pens, text, colors, and shapes.
The new screenshot utility is available by using the keyboard shortcut Command + Shift + 5, which will display all of the screenshot and recording functions in a floating toolbar near the bottom of your display.
If you tend to forget keyboard shortcuts, you can also launch the screenshot utility by opening a Finder window and navigating to /Applications/Utilities and double-clicking or tapping the Screenshot app.
You can also drag the Screenshot app to the Dock to have it available at any time, with just a click or tap.
If you would like to discover more about using the new Screenshot app, I suggest: A Guide to macOS Mojave’s New Screenshot Tool
Beyond Our Five Utilities
We only scratched the tip of the iceberg when it comes to utilities for the Mac. Not only does the Mac OS come chock full of useful apps and utilities, but there are a large number of third-party utilities that many people wouldn’t think of running their Macs without.
If you have a favorite Mac utility, tell us about it in the comments section, below.


Thank you for this post!
I just upgraded from High Sierra to Mojave and was having a devil of a time finding where Apple had hidden Network Utility.
You can find the Network Utility at:
/System/Library/CoreServices/Applications
Tom
Wireless Diagnostics seems a little goofy. When I ran it on my iMac2011 running Mojave and connected to the Internet ONLY by Wifi (5G), it said:
LAN Connectivity Failure
Try Restarting your wireless router.
I ran Ookla Speedtest and got Mbps Down /11.9 Mbps Up.
Anyone else see strange results from Network Utility?
Apple and you have not spent any time on two of my most important utilities, but moat obsolete: Contacts and Calendar. Maybe there is a great 3rd party app for these-what do you recommend. I’m very simple and use email, Contacts, Calendar, Word, Xcel, manage files and messages. Normal extent of my usage. Make my life easier, Apple certainly doesn’t recognise my needs as they make everything more complex – KISS isn’t in Apple’s operating philosophy! Thank you. Rudy
Very helpful – especially Automator+QuickActions!
thanks a lot!
What about Disk Utility? Can it rebuild directory of APFS disks?