


If you enjoy discovering hidden features of your Mac, then it’s a good idea to get acquainted with the Option key. The Option key is like that special book in a library that, when moved, causes a secret door to swing open. In this case, the secret that is revealed is a Mac feature that is hidden from most users.
Apple hides these commands, menus, and features to help keep the user interface less cluttered, hiding lesser-used features that only become visible when the Option key is invoked.
If you’re ready to explore the Mac’s interface, then pull out the keyboard, place your finger near the Option key, and we’ll discover some of the Mac’s hidden features.
The Finder’s Optional Secrets
The Finder has a number of commands that only become available when the Option key is depressed. Unless otherwise mentioned, the Desktop or a Finder window needs to be the front-most item for these tips to work.
We’ll start with the Finder’s menu bar.
Apple Menu
Though the Apple menu isn’t part of the Finder, it does share space with the Finder’s menu bar, so we’ll start with it.
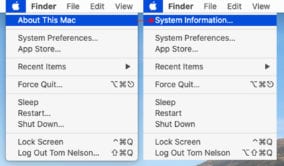
About This Mac ➔ System Information: Hold down the Option key and the menu items change to System Information. System Information bypasses the multi-step process of opening the About This Mac window and selecting the option to generate a system report. Instead, by holding down the option key when you select the Apple menu, you can click on System Information and jump directly to the report.
File Menu
The File menu offers a number of hidden capabilities, all available with the press of the Option key.
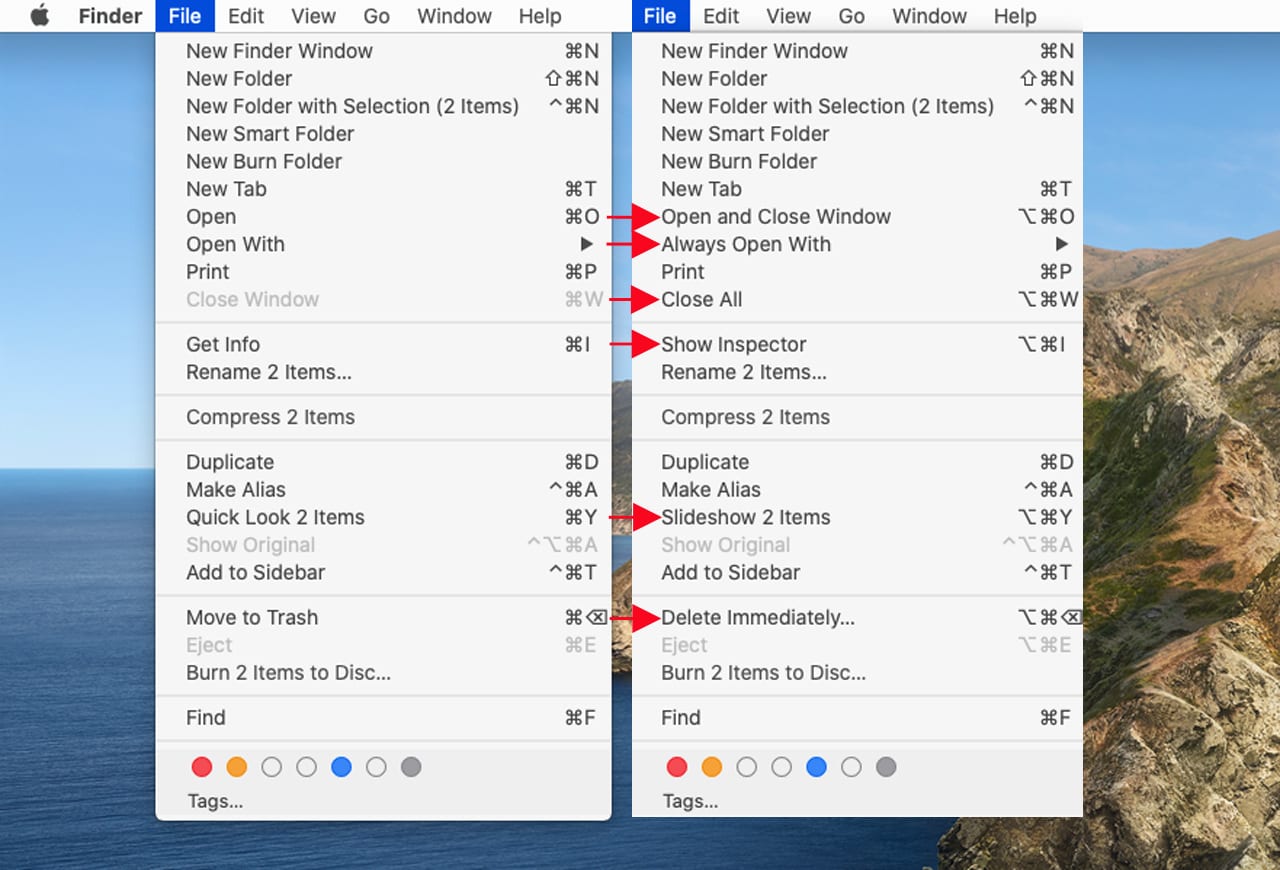
Open ➔ Open in New Window and Close: When you have a file selected in a Finder window, holding down the Option key will change the Open menu item to Open in New Window and Close. This odd-sounding command will open the selected file in the default app for the file type, and close the current Finder window.
Tip: You can also right-click a file name, hold down the Option key, and select Open from the dropdown menu. Although the Open menu item doesn’t change its name in the popup menu, it will cause the Open in New Window and Close process to occur.
Open With ➔ Always Open With: With a file selected in the Finder, hold down the Option key to see the Always Open With menu item. This is a nifty way to change the default application used to open the selected file. Even better, the change only affects the selected file; all other files with the same file type will continue to be opened by the usual default app.
Close Window ➔ Close All: When you have multiple Finder windows open, you can quickly close all of the windows at once by holding down the Option key.
Get Info ➔ Show Inspector: With a file selected, holding down the Option key will change the Get Info item to Show Inspector. This may not seem like much of an improvement since it appears as if the same Get Info panel becomes visible, displaying attributes of the selected file. The difference is the Inspector panel is now dynamic, and will display the information for any file you select without having to open multiple Get Info windows.
Quick Look ➔ Slideshow: With one or more files selected (the more files selected, the better) holding down the Option key will change Quick Look to Slideshow, which will display the selected items as a full-screen slideshow. You can read more about the Slideshow option in 10 Fantastic Mac Finder Tips.
Move to Trash ➔ Delete Immediately: If you’re tired of filling up the Trash with files and then having to delete the trash later, you can speed up the process by holding down the Option key and selecting Delete Immediately. The selected file(s) will be deleted right away, with no opportunity to change your mind later and recover them from the Trash.
Edit Menu
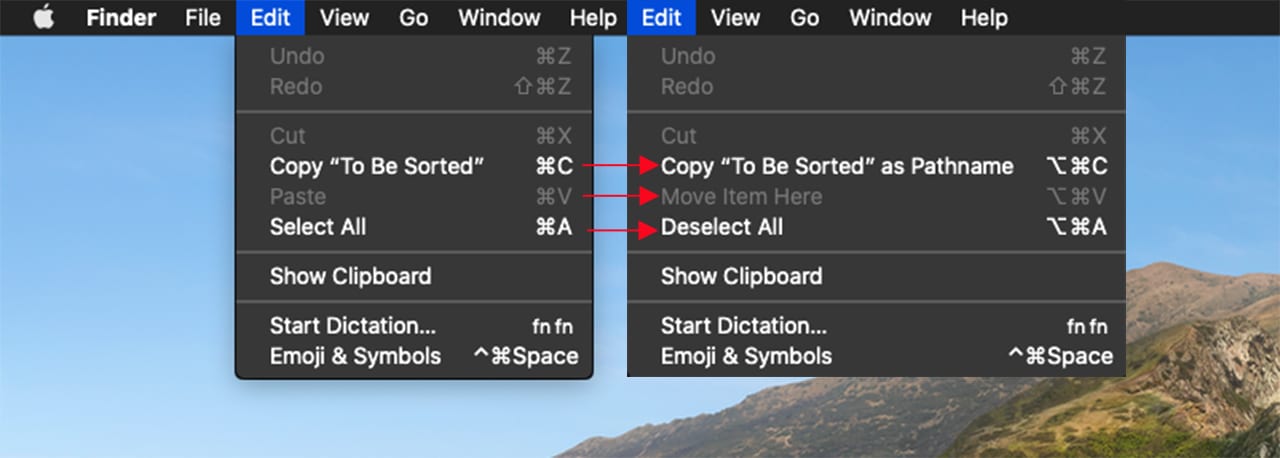
Copy ➔ Copy Pathname: With a file selected in the Finder, holding down the Option key will change the Edit menu’s Copy command to Copy Pathname. This will cause the pathname of the selected file or folder to be copied to the clipboard.
Paste Item ➔ Move Item Here: The task of moving files around your Mac can be simplified with this hidden trick. Select a file you wish to move and use the Finder’s Edit menu to Copy the item. Next, navigate to the folder that you wish to move the item to. Hold down the Option key, and the Edit menu will change from Paste Item to Move Item Here. This allows you to move the item, as opposed to pasting the item, which creates a duplicate.
Select All ➔ Deselect All: When you have a large number of items selected you can quickly unselect all of them at once by holding down the Option key, clicking in the Finder’s Edit menu, and picking the Deselect All menu item.
View Menu
Arrange By ➔ Sort By: When you have a folder window open, you can specify the criteria to arrange and sort the information in the selected folder. Normally, only the Arrange option is shown in the Finder’s View menu, but when you hold down the Option key, the Sort By options are displayed. Arrange By sets broad categories to display the content of a Finder window, while Sort By sets the sorting order within a category. You could use Arrange By to display items by date, grouping items into today, yesterday, month, or year, and then use Sort By to have each category displayed in alphabetical order. You can find out more in: Mac 101: Customizing Finder Views, Part 2.
Window Menu
Minimize ➔ Minimize All: You can minimize all open Finder windows to the Dock by holding down the Option key and selecting the Finder’s Window menu, Minimize All.
Zoom ➔ Zoom All: Zooming a Finder window will cause the window to expand to show its content without the need to scroll (if possible). By holding down the Option key and selecting Zoom All, every open Finder window will expand. If you select either the Zoom or Zoom All item when a Finder window is already expanded, it will shrink back to its original size.
Bring All to Front ➔ Arrange in Front: If you have one or more Finder windows open, but obscured by other app windows, you can bring them to the front of all other windows with the Bring All to Front menu item. If you hold down the Option key the menu changes to Arrange All in Front; this will cause the Finder window to come to the front and be centered on the display. If there are multiple Finder windows, they will cascade behind the center one, showing the title of each Finder window so you can select the one you want.
Additional Menu Bar Items
The Option key can also have an effect on the apps shown in your Mac’s Menu Bar. In some cases, holding down the Option key will cause menu items to change, just like our previous examples. But in other cases, the Option key has to be depressed and held as you click on the app’s icon in the Menu Bar.
Time Machine
Backup Now ➔ Verify Backups: If you’re a Time Machine user, you’re probably already aware of the Time Machine menu bar icon and the Backup Now menu item that lets you manually start a Time Machine backup. If you hold down the Option key, the menu will change to Verify Backups, which will work with any Time Capsule, NAS, or Time Machine backup attached to another Mac. You can find out more about using the Verify Backups command in Tech 101: Everything You Need to Know to Verify Time Machine Backups.

Enter Time Machine ➔ Browse other Backup Disks: Enter Time Machine allows you to see the content of your Time Machine backup, but if you need to view a different Time Machine backup, say one you usually keep offsite or that’s part of a multiple drive backup system, you can hold down the Option key and select Browse Other Backup Disks.
Bluetooth
Holding down the Option key and selecting the Bluetooth menu bar item will display the current version number of the Bluetooth software, the name of your Mac, and its Bluetooth address.
Sound
The Sound menu bar item normally displays a volume slider and the output devices that you can use. If you hold down the Option key and click the Sound menu bar item, you’ll see both the output and input devices available to you.
Wi-Fi
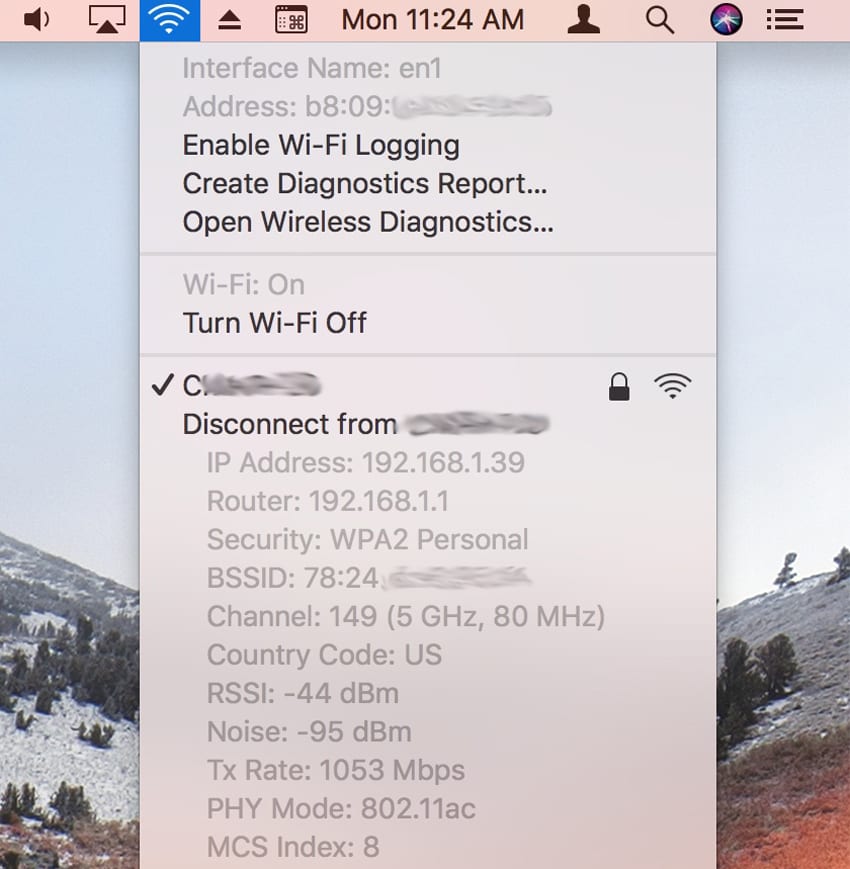
The Wi-Fi menu item normally shows Wi-Fi networks nearby that you can connect to, but if you hold down the Option key and click on the Wi-Fi icon in the menu bar, you’ll see additional Wi-Fi information, including IP address, Router Address, Security type in use, channel in use, transmit rate, and a good deal more. You can also run Wi-Fi diagnostics and access logs to help you troubleshoot connection issues.
Notifications
Holding down the Option key and clicking the Notifications icon in the menu bar will turn on or turn off Do Not Disturb mode.
Give the Option Key a Try
In this guide, we used the Finder to give you an inkling of what the Option key can do to modify menu choices and reveal new commands. Many of the Option key tips will work in many of the apps you use day-to-day, as long as they adhere to the standard Apple UI.So, go ahead, launch your favorite app and see what the Option key does to the menu items. Be sure and let us know in the comments below if you find any interesting secrets.


Good tips, thanks!
Thanks for the article.