

With 90% of the U.S. currently under stay-at-home orders, I’m sure there are many musicians and artists exploring home recording for the first time. Or, perhaps you already have some experience and want to improve the quality of what you record at home.
In this article, I’ll offer some quick tips that are easy to implement and will help improve the sound of your home recordings.
1) Using Headphones for Mic Positioning

Whether you are recording yourself or recording others, I cannot stress how important it is (and how much time you’ll save) by putting on some headphones and listening to how your mic placement affects the tone of your source.
If, for example, the source instrument is an acoustic guitar, put on a pair of reliable headphones and have the performer play while you move the microphone(s) around until you hear the tone you are after. If you’ve never done this before, it will probably be the most valuable 5 or 10 minutes you’ve spent in the home recording process. Turn up the volume and listen to the subtle and major differences in how the sound is affected by different microphone placements. Make mental notes — how does it sound when up close as possible? How does it sound when farther away? How does it sound when the microphone is pointed on-axis vs off-axis?
Headphones for mic placement. Critical.
2) Drums: Keep It Simple
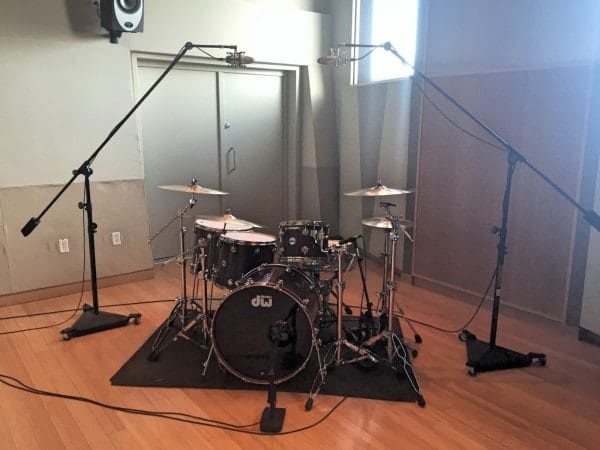
Assuming you are relatively new to recording drums, I recommend a minimal approach. If you search the internet for drum mic techniques, you’ll find a virtually endless amount of information, with some engineers utilizing 10 or more microphones. As a novice, that’s going to drive you nuts and is likely to make things more difficult down the road when you’re ready to mix.
In that vein, I recommend a simple four-microphone setup. One mic outside the kick drum, another for the snare, and a simple stereo pair above the kit. Take your time with mic placement, especially if you haven’t done it before. While not my preferred placement for overheads, it’s probably easiest to start with a spaced pair. We could easily spend an entire article on microphone configurations for various stereo patterns, but a spaced pair will get you well on your way.
3) Vocal Tracking Tips

When you are ready to track vocals for your song, it’s important to consider a few things to set you and/or your talent up for success.
First, it is absolutely critical to make sure that the mix of the song is well balanced along with the vocalist’s monitoring level of their voice in their headphones. If the vocal is too quiet, the performer is probably going to struggle to feel like they are “in” the track and may even push their voice too hard. As a result, the emotional component will certainly suffer, and the performance is likely to be riddled with technical issues, from being too “pitchy” to not being in the groove. If the vocal is too loud in the headphone mix, the performer is likely to hold back and you’ll end up with a performance that is awkward and timid. I think this is one of the most overlooked aspects of recording vocals.
Second, take an extra minute or two to dial in some reverb for the performer’s headphone mix. This will help them feel like they are singing in a comfortable environment and will encourage the best performance possible. These days, most audio interfaces come with a software mixer that allows you to provide reverb in the headphone mix while recording the dry signal (with no reverb).
4) Use Closed-Back Headphones
Open-back headphones are great for mixing and listening, but are terrible for recording. Use a good pair of closed-back headphones to minimize sound leak and you’ll be happy when it comes time to mix.
On a related note, be especially careful when tracking anything that uses a live microphone. If you’re recording to a click track, you’ll want to make sure that your headphones are not so loud that the microphone is picking up an excessive amount of the click. There are tricks to get rid of this should it be a problem, but better to avoid it altogether.
Some great closed-back headphones include the Sony MDR-7506, Sennheiser HD 280 Pro, and Audio-Technica MH50x.
5) Hang Blankets, Use Carpets

If you’ve been forced to create a makeshift space for tracking vocals and instruments, chances are that your room does not have ideal acoustics. While it’s not perfect, you can improve things dramatically by hanging some blankets around the microphone position. Moving blankets are relatively inexpensive, but really any type of blanket will offer a big improvement in most circumstances. Experiment and listen with headphones as you place your mic, and you’ll find what sounds best in your room. You can hang blankets on mic stands, or get creative with whatever you have around the house. I usually find that creating a triangular pattern of hanging blankets in front of the performer does an acceptable job of improving room acoustics.
6) Meticulously Evaluate Your Recording Space
Don’t assume that any deficiencies in your recording space can be fixed later, “in the mix”. Start by walking around your room and listening very carefully. What noises do you hear? Typical culprits may include fans from your computer, HVAC noise, or maybe even the fridge in the next room. Is the room in the front of your house with noise from an occasional car driving by? Be wary of “sneaky” noise too, like something that might rattle on a wall or table. Do a couple laps around the room, then put up a microphone and get some headphones and go through the exercise again.
Since you are recording at home, and likely utilizing a spare room or living room, we are not seeking perfection. But, you’ll save yourself from a headache later on by doing whatever you can at the beginning of the process to create as quiet a space as possible.
7) Record Using 24 Bits
No matter your sample rate (i have been using 48 kHz / 24-bit recently), using 24 bits instead of 16 bits for your bit depth is certain to improve your sound. You’ll benefit from some additional headroom, improved dynamic range, and signal-to-noise too. It’s a simple setting to adjust in any DAW, and its effect on CPU usage is negligible.
Conclusion
I hope these quick, simple tips will help improve your home recordings. I know a lot of people are being forced to get creative with home recording setups, but now is the best time to experiment and learn in the process. In my next article, I’ll share some DIY projects that are not only a great way to pass the time during the era of social distancing, and Working From Home (WFH) but will also offer a great investment for any of your future home recording endeavors.
Stay safe!


Hi in the photo for 5.) with the blankets and carpets
What exactly is the stand setup for holding up the moving blankets I’m interested in trying that out myself, thanks