

As Sheriff Roscoe P. Coltrane might say, “Good News! Good News!”
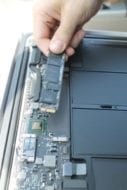
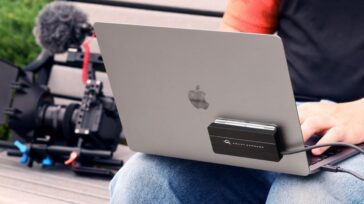
We’ve confirmed that the flash storage on the 2011 MacBook Air is the same removable module type design as found on the 2010 models. But don’t take our word for it – here’s a couple quick shots of the module right after we bought the machine.


As you can see, the data interface on the 2011 model’s flash module is the same as the one on the 2010 model. In fact, it’s the same unit entirely, like we mentioned earlier. That means you can put in a faster, higher-capacity OWC Mercury Aura Pro Express SSD for higher performance and up to four times the storage compared to the factory 128GB capacity version.
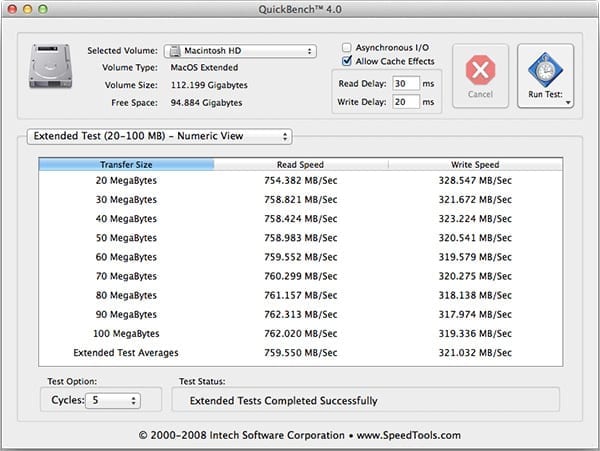
While those quickie teardown sites “scooped” us on whether or not the flash storage module was removable, we for sure have the bigger headline news. We’re in the unique position to actually test the Mercury Aura Pro Express SSD in this new machine and not assume it would just work. Roscoe gets to take another bow here as the good news is our SSD…the first and only for MBA 2010…works perfectly in the new 2011. Take a look at these benchmark comparisons to the stock drive for verification:

While we still manage to be faster than the stock drive across the board, the Aura really shines with the reading and writing of smaller files. So while it’s no slouch when it comes to transferring large files, you’ll see a real speed boost when you’re moving smaller chunks of data to and from the drive—such as when you’re booting the OS or launching programs.
Plus… well… you know… the “little” fact that now you can also drop 480GB in where as little as 64GB used to reside… ;-)
I have a 2010 MacBookAir 11.3” and I’m planning on doing the same thing when my new i7 MacBookAir arrives.
s there anything I can do beforehand to make sure I can just plug and play, or will I have to do the insert-and-CmdR thing? (Does anybody know how to do that without running afoul of rEFIt?)
(It could be that Apple releases an omni-comprehensive 10.7.1 software update before the machine arrives – I suppose that would be universal?)
If you’ve upgraded to Lion already on the 2010 MacBook Air, then transferring the drive should be plug & play. If you’re waiting to receive the 2011 MBA to make the switch to Lion, then you’ll want to follow the instructions OWC Chris provided in his comment from July 22nd.
I’ve been running Lion on the 2010 MacBookAir since Lion’s Golden Master was released (exact same build as the final official release)… so I needn’t do any Internet Recovery thing when I plug the module into the 2011 model?
So far this is notgoing very well.
Simply swapping in the OWC Aura (containing a stock installation of 10.7.0) into the new Air didn’t work, I presume it’s lacking drivers (kexts) for the new hardware.
Using the shipped build to make a booable USB stick got me as far as the option to restore from a Time Machine backup, but then bailed when it realized the TM backup was that of a Server-class install, whereas the Air is licensed only as a Client.
So now I’m stuck. I’ve shuffled stock SSDs and the OWC SSD back and forth so often I’m startimg to womder how many insertions the mechanical connectors are good for.
Any suggestions to break me out of this loop?
Apple did release the Lion Recovery Disk Assistant two days ago and that may help. Otherwise, please contact our Technical Support department and they would be happy to help troubleshoot.
Hi! I just purchased the new Macbook air 11 and installed my 250gb aura on it…
I was able to do the method yuo described here (with 2 USB’s drives) and it is booting normally but
when i boot with cmd+R it tells there’s a problem intalling Lion and i must try again…
i can only access disk utiliy…
What should i do?
On both SSD’s stock and Aura it has the same problem now…
best
Victor
As long as you’ve used disk utility first to format the Aura SSD, there shouldn’t be a problem installing. For assistance in getting that drive up and running, please contact our Technical Support Team at 1 (800) 275-4576 and they can troubleshoot with you.
Hi
Got this answer from OWC ,
go to system preferences / startup
and choose the new drive as startup (with whatever name you used)
voila! you are ready to go
How do the OWC Aura SSDs compare to the Samsung SSDs currently shipping in some of the MacBook Airs?
+1 for a 6GBps Aura and external case for manufacturer SSD
Also, looking for a breakout box like the Thunderbolt Display (GB Ethernet, Firewire 800, USB), but without the monitor.
That breakout box should include GB Ethernet, 2 ESATA ports, FW 800 and USB. Leaving out the ESATA ports locks out all the older machine owners that have been waiting for a good replacement to the express card 34 port!
When will the 6Gbps OWC Aura SSD available for Macbook Air 2011??
Hi KM…no such product announced yet…you’ll just have to keep coming back to the blog for any official announcement.
Thanks for your interest!
i just ordered the 480gb ssd for the new 2011 macbook air. after i install the drive, how do i reinstall lion with included usb?
There are two methods you can select to prepare using an OWC Aura Pro Express SSD in your Mid 2011 MacBook Air.
ONE.
Internet Recovery Mode via Apple Knowledge Base Article #HT4718
http://support.apple.com/kb/HT4718
TWO.
Recovery Partition Restore Mode
1.) Make SURE you have a Time Machine backup or clone of your data (from either the Apple factory stock flash drive or OWC Aura Pro Express SSD) on an external drive. We will refer to this drive as Drive #1.
2.) Boot to the recovery partition on the stock drive by holding down Command R during a restart or boot process.
3.) Use Disk Utility to do a restore on a separate external USB drive. DO NOT use the same external drive that was used for your Time Machine or clone backup. We will refer to this drive as Drive #2.
4.) Replace the MacBook Air’s stock flash drive with the OWC Aura Pro Express SSD.
5.) Boot to the USB Drive #2’s recovery partition.
6.) Use Disk Utility to do a restore to the OWC Aura Pro Express SSD.
7.) Restart or Boot to the OWC Aura Pro Express SSD.
what does “5.) Boot to the USB Drive #2′s recovery partition.” mean exactly.
and if you are using drive #2 to restore whats the point of of drive #1?
thanks
Lion is different than previous iterations in that the OS makes its own “recovery partition” on the drive it’s being installed on. This partition is hidden most of the time and booting to it is similar to booting to the Install Disc on older systems. It’s Apple’s approach to the problem of dealing with a corrupted partition without it on separate media.
However, the process is such that installing Lion on a drive repartitions it, which can cause loss of data – effectively, you’ll be installing Lion twice; which is what was meant by “restore” (as that’s what Apple is calling it). Once you have Lion installed from Disc 2, you bring your data over from Disc 1.
I was thinking of another method that I used when upgrading my MacBook Pros to a larger disk (in Snow Leopard)
Using Carbon Copy, I copied the entire disk to a new external hard disk.
I then replaced the disk in the Macbook Pro and booted off the external disk.
I then Carbon Copied the external disk to the new disk.
I keep the external disk as a copy incase I ever need to go back to the original version.
I use the original disk for anything, just don’t depend on it too much as it is already over two years old, was used daily and I am very cautious about the life of hard disks.
Would this also work with upgradig the SSD on the new Macbook Air with Lion?
I am not going to fill the 128Gb that quickly that I cannot wait for the SATA 3 SSD and external box for the replaced SSD.
The problem with this method is that it doesn’t take into account the “restore partition” that Lion installs. As great as CCC is (I use it all the time), you’re only cloning over the data on the main partition, not the invisible recovery partition.
With the 2011 Airs, your best bet is the Internet Recovery option I outlined elsewhere in the comments. Otherwise, the “dual drive” method mentioned is the way to go.
Hello Chris
With the new Lion Recovery Disk Assistant application, what is now the best way to load Lion on an updated Aura SSD to the new Macbook Air?
Also, any news on a SATA III version?
Regards
David
I’ve tried the cmd+R restore a million times, and I’ve tried to do option #2 restoring to a different drive other than my back up. No matter how many times I’ve tried, I get one of 2 restore problems: 22 or 254. I’m going to return the new macbook air tomorrow.
Too frustrating. Hopefully someone will sell a housing (like they used to) for the external flash drive so you can just do a re-partition of that. Wasted about 10 hours so far.
I am trying to use both methods on my new macbook air, moving a 480GB stick from my 2010 11″ to a new 2011 13″ model.
Is there a way to format the drive before installing so I can invoke the internet recovery? Whenever I attempt to create a USB #2 drive, I receive errors (22 or 254).
Also, any clues why I am receiving a grey circle with a line through it when I try to just swap the drives? The 480GB is running Lion Golden Master. I am able to put my original 11″ 128GB drive in which is running Lion Developers preview 4, and that boots just fine. Thoughts?
is there a preferred or recommended option from the ones you suggested? For option #2, do I still have to re-install iLife apps from the appstore (like according to http://support.apple.com/kb/HT4718 for option #1) or can I avoid that step (reinstalling iLife that is)
While the second method should theoretically avoid the whole re-downloading issue, if you have the bandwidth, it’s probably best to go with the first method (Internet Recovery) and just restore the download. According to the article you linked, the only thing it’ll cost you is bandwidth.
Have you considered or do you offer something that would let me put the SSD that i remove from my MacBook Air into some sort of external enclosure. I just ordered a 480 GB to replace the one coming in my new 2011 MacBook Air that arrives next week and while I look forward to the OWC drive, I hate to just have 128GB lying around doing nothing. BTW, I have been running a OWC SSD in my 2 1/2 year old MBP for a long time and it still out performs the new SSD’s that Apple delivers with their new MBP’s.
Hi Mike and glad to hear our SSD for you MBP is still rockin’. Yes, an external enclosure would be cool…just hold on to that factory module and we’ll see what the future brings!
I’d love to be able to plug my old factory Air SSD into my 17inch unibody MBP. Please guys, make something that will let me do that.
–Rick
Early reports indicated Apple Trim in Lion will only work on Apple Ssd. True? Matters if true?
We discuss this topic in our blog post To TRIM or not to TRIM (OWC has the answer)
Thanks for the link, I’m running one of your OWC 240 GB SSDs in a mid-2010 on SnL and haven’t attempted the “trim hack” or installed 10.6.8
The SSD does boot faster (and run disk access faster) than the former HD, but whatever pixie dust is in my 11″ Air, hasn’t quite made it to the Mini with OWC SSD. Still, I’m happy with it.
From the link, I gather TRIM butts heads with the Garbage Collection in SandForce.
Is TRIM automatic in Lion? Can it be turned off? [ Contemplate image of two big Rams butting horns ]
Any word on whether or not the port is SATA-III capable?
Yes, system profiler shows the port is 6Gb/s capable. However, the Aura Pro Express uses a SandForce SF1200 Series processor which is rated for SATA Revision 2.0 speeds.
Michael – Are you guys planning on a 6Gb/s Aura drive using Sandforce’s SF-2200 controller in the near future? Coming from a 15″ MBP with an SSD capable of SATA III speeds, the 2011 MBA’s 3Gb/s speed is slightly disappointing, haha.
…no such product announced yet…you’ll just have to keep coming back to the blog for any official announcement.
I have a 2010 MBA 11″ with an OWC 360GB SSD and yesterday bought the 2011 MBA 11″. I swapped the 360GB into the new machine. First of all it is snug fit but with a bit of patience it is possible to line up the retaining screw. Unfortunately it will not boot and I get the dreaded “no entry” sign. Booting into utilities allows me to see and verify/repair the drive but it still will not boot. Both machines are running Lion. Put the 360 back in to the 2010 model and boots first time. This could be a firmware problem perhaps? Anyone seen similar problems?
This is because the 2011 MBA’s use a special build of Lion and will not work with prior versions. You’ll need to do an internet recovery – hold down ctrl-r and load up disk utility and reinstall on the 2011. That should get you right back up and running.